Contour Queen: Master Your Technique
June 26, 2013

Contouring is a makeup technique used to define and enhance a face’s natural features—not only will this look create the perfect glow for summer, it will also slim your face — who doesn’t want that? Follow this contouring routine for radiant, slim-tastic perfection.
Step 1: Start with foundation on and problem areas, like acne, concealed. Using a concealer one shade lighter than your skin tone, highlight by sweeping the product across the top and bottom portion of the lips, the bridge of your nose, under eyes, to the brow bone and atop cheekbones.
Step 2: Blend the highlighting concealer with a stippling brush.
Step 3, 4 & 5: To create sharp, bronzed lines, use a large eye shadow brush to apply bronzer diagonally under your cheekbones, at the base of the your hairline, on the sides of your nose, on your jaw line and under your chin. This contouring technique will add an elongating affect to a rounder face.
Step 6: Using a large blunt-cut brush, blend the bronzer; be sure to blend in the direction of the facial lines you are contouring.
Step 7: To make cheekbones stand out even more, apply a shimmery cream product to the top of the cheekbones and to the apples of the cheeks using a blush brush.
Step 8: Set and blend the highlighting and contouring products with a loose powder.
Voila!

Cheek Perfection! Get The Perfect Cheek With 3 Easy-to-Master Products
April 10, 2013

Between contouring, highlighting, and other beauty buzzwords right now it can seem a bit confusing when it comes to cheeks! Pulling out all the stops is fun for special occasions but on a daily basis it’s nice to simplify. Here are 3 products to add to your routine to get that perfectly sculpted cheek everyday!
- To start, you’ll need a matte bronzer, a shimmery highlighting powder, a blush, and an angled brush and a blush brush.
- Start with your angled brush, swirl it into your matte bronzer and apply in a line to the hollows of your cheeks. Sweep it back and forth so it’s blended.
- Dust off your same brush and sweep your highlighting powder on the tops of your cheekbones.
- Take your blush brush and apply your colour starting on the high point of the “apple” of your cheek. Don’t know where the apple of your cheeks are? Just smile! That round higher “cheeky” part that goes up when you smile? That’s the apple! The majority of your blush goes here.
- Now blend your blush back towards your temples. Don’t reload your brush, just use the remainder for this. This will blend everything together!
- Voilá! The perfectly sculpted cheek!
The Copper Smokey Eye For The Green Eyed Girl
January 4, 2013

Colored shadows can be tricky to work with, but you can’t go wrong with shades of brown and copper since it works well with practically every skin tone and eye color. Browns are great for everyday wear since the natural shadows of your lids are a brownish red. Eyes are the first thing people notice; make them clean, defined, beautiful and not too distracting. You want people to notice you, not your heavy makeup so here’s a way to give your eyes that bit of pop it needs without being overdone. This is a great basic everyday look that can be changed up easily and worn for any occasion.
Step 1: Start with clean eyes and apply primer all over the lid up to your brow bone. Elf Primer is a great alternative to Urban Decay’s Primer Potion. For only 1 dollar compared to a 20 dollar primer, it’s a must have.
Step 2: Apply a red toned brown shadow all over the lid up to the crease with a wide blending brush. Mac’s Brown Script is matte and has great pigmentation with no fallout. (more…)
The Power of White Liner
October 30, 2012

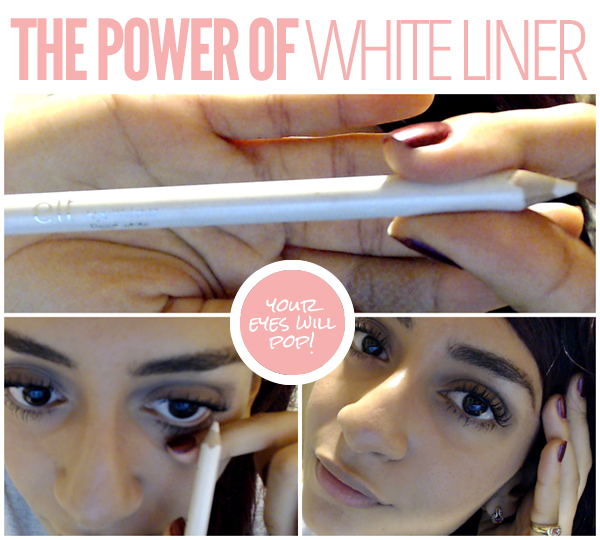
White liner is never thought of as a secret weapon, but girls, let me tell you: if you want your eyes to look awake, large and open, using white eyeliner is just what you need. Lots of brands have white liner, NYC jumbo pencil in Milk is a great choice, as is the one I’m using by E.L.F. MAC has one (as well as flesh toned ones) and copious others. Using the daytime smokey eye as a template, as it is not quite as dramatic, adding the white liner includes a special flair:
- Carefully lay your finger under your eye. This is gentler than tugging your eyelid down which is harsh on the delicate area.
- Sweep the liner across your waterline, careful not to get any on your lashes. If you do, just add more mascara to mask the white.
- Do the same on the other eye, adding more mascara if necessary and say hello to a more wide awake appearance (perfect after those all nighters studying).
Enjoy!


