No-Heat Waves
May 11, 2014

Step 1: Begin with dry hair parted and combed the way you want it for the hairstyle.
Step 2: Split your hair in 2 halves and begin by taking out a 1 inch section and clipping away the rest of the hair.
Step 3: Spray a generous amount of water onto your hand using a spray bottle.
Step 4: Run your hand over your hair a few times until the section is damp, but not too wet. (more…)

A Sweet & Simple Updo
February 13, 2014
Step 1: Begin with your hair in either it’s natural texture, or curled. I decided to curl my hair to make the look a little more romantic.
Step 2: Part your hair how you want it and section off a 1-2 inch section starting at the beginning of the part down to the ear.
Steps 3 & 4: Pin the section behind your ear using a bobby pin.
Step 5: Section off the top 1/3 of your hair, being careful not to ruin the section you just pinned.
Step 6: Using a boar bristle brush, tease this section of hair.
Step 7: Smooth the top of the hair and pull it back.
Step 8: Tie the section off with an elastic.
Step 9: Take a 1 inch section out of bottom of the ponytail.
Step 10: Wrap it around the ponytail until it reaches the end and hold in place with a bobby pin. Spray on a small amount of hairspray and… voila!
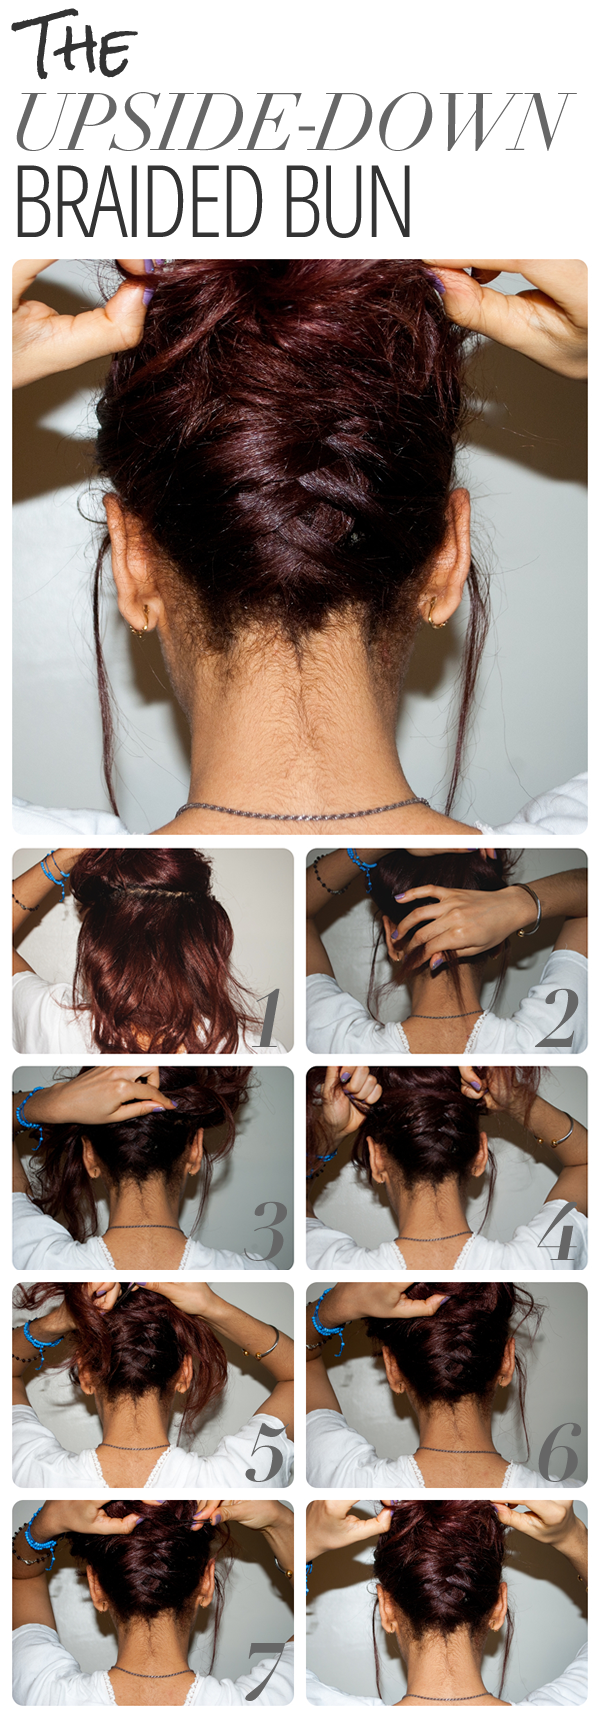
Upside Down Braided Bun
June 26, 2012
An excellent look when you want to look like you put a bit more effort into your bun that most days (you know, to fool people into thinking you totally didn’t wake up late or anything), the upside down braided bun is easy, simple and can be done in less than five minutes. The best thing about this braid? Shorter-haired girls can rock it, too. (Note: I used the fishtail method for my braid, but I am sure it would work with your standard three – its all experimentation.)

1. Divide your hair in two, pinning the top to give you room for your braid.
2. Next, start your braid as you normally would by sectioning out two pieces. Tip: lower your head forward to allow a semi-flat surface to construct your braid.
3, 4, & 5. Continue braiding until you have braided up the entire section and secure with bobby pins; you will remove them later so it doesn’t matter if they show at this point.
6. Now, gather your top section into your desired bun, either a perfect ballerina bun or a messy bun and secure them with more bobby pins–this time hiding them efficiently.
7. Fix up any flyways and you’re done!
Summertime At The Sea? Try The French Fishtail Seashell Braid
June 22, 2012
During the summer months our style transforms to fit our surroundings. There aren’t many hairstyles that will exude a beachy feel like the French Fishtail Seashell Braid! Although this braid is intermediate on the skill level, we’re confident you can master this look. Follow the steps below and you’ll be sporting this beachy look just in time for vacation.

- The way you part your hair for this braid will effect the outcome. I recommend starting at the top of your head but towards the side (of your choice) to create a pretty side part.
- Begin french fishtailing on the top side of your head (to french fishtail, start with two sections and cross over each other, than continue to fishtail while gathering pieces as you go).
- While doing your braid, guide it diagonally across the back of your head. Once all hair is gathered, secure with an Elastic.
- Tightly fishtail the hair secured within the elastic and secure once again with another elastic. Then wrap the end of the braid up into a twisted bun. This should give a ‘seashell’ look. Secure with bobby pins once finished.
Now that you’ve mastered the French Fishtail Seashell braid, the only thing that’s left to do is plan your next tropical getaway! If you can’t wait that’s okay. With this hair style, you’ll feel like you’re on vacation no matter where you are!


