The Ultimate Faux Hawk
March 20, 2014

Disclaimer: This hairstyle is for the bold, brave and ultra glamorous! It also takes a tad bit longer than most tutorials I have posted. If you’re up for the challenge, check out the steps below for the Ultimate Faux Hawk!
Step 1: Curl your hair. For the best results, try to make tight curls and clip them up to let them set for a few minutes. The more volume you start with, the better!
Step 2: Divide your hair into three sections: The top section needs to be clipped up out of the way, the Middle section needs to be a sleek, tightly secured ponytail, and the bottom section needs to be a low ponytail.
Steps 3 & 4: Once the bottom section is secured into an elastic, take your middle section and make sure it is tight and sleek on both sides (this is the part of the hairstyle that gives the necessary ‘faux hawk’ impression!). Take some of the curls and secure with bobby pins to cover the base of the bottom ponytail.
Step 5: Here is the fun part! Starting with the back of the top section working your way forward, begin to tease and pin portions of the hair back. This is crucial to give the end result volume.
Steps 6, 7, and 8: Do a once over and secure any loose pieces in place, then spray with hairspray!
Voila! Keep in mind that this edgy hairstyle pairs great with a super girly ensemble! Play around with this look and dress it up with glam accessories and bold red lip! Enjoy!

The Chinese Staircase (revisited)
December 5, 2013

Looking for a new play on a ponytail that’s unique and fun? Look no further than The Chinese Staircase. This is one of those hairstyles that look extremely complicated, but in fact are quite simple. But, regardless of the skill level needed for this style, either way it will be sure to be a conversation starter! See the steps below!
Step 1: Take a strand from the front of your head and hold apart from the rest of your hair. Gather the rest of your hair to the side and secure with an elastic.
Step 2: Grip the strand with one hand, and using the other wrap the strand around the front of the ponytail and loop it to create a knot.
Step 3: Gather another strand of hair from the ponytail and combine it with the end of your knot. Add a small amount of gel to combine the two pieces to avoid fly-away’s.
Steps 4-10: Repeat steps 2 & 3 on the new strand of hair. Continue these steps as far down as you would like.
Step 11: Secure the bottom with an elastic.
Voila! And there you have it! You’ve created a look that is anything but ordinary. So the next time you’re looking to put your hair in a ponytail, try this version to spice it up!
The Glam Kitty Halloween Makeup Look
October 30, 2013

It’s that time of year again! The time of year where you can take your makeup to new, terrifying heights! But what i you’re not looking to channel your inner zombie or vampire? Maybe you’re even looking to keep it cute or glam this season. Well, there is nothing easier than the classic kitty look! Follow the steps below to tack this purr-fect look!
- Start with your usual face of makeup. The great thing about this look is it’s a great add-on to your usual routine. Perfect for attending a halloween party after work!
- Using your liquid liner, start on the inner corner of your eye and make a curved line down the direction of your nose. Apply to both eyes.
- Using your liquid liner again, make a curved line across the tip of your nose. Then making a triangle, continue the liner down where your nose meets your top lip. Color in if necessary.
- Continue the liner down the center of your top lip.
- Using the tip of your liner brush, gently place little dots to the left and right of the center line down your lip. (I personally think it looks better than whiskers, but feel free to add whiskers if you’d like!)
- To glam up this look, I applied a bright berry red lipstick.
Voila! There you have it! Halloween doesn’t always have to be ghoulish or gruesome! Debut this glam kitty look at your upcoming Halloween event and you’ll be sure to steal the spotlight! Happy Halloween!
The Messy Bun
October 24, 2013
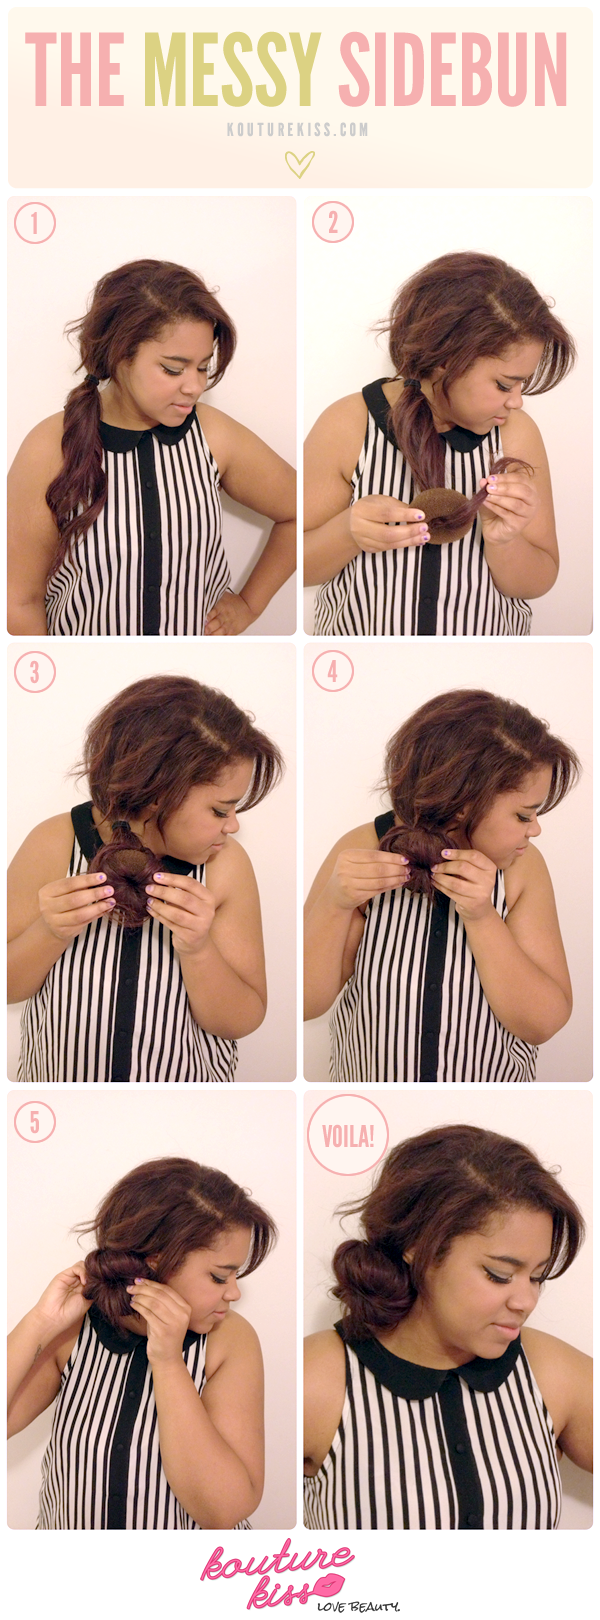
There is no need for me to go in to detail of my love for buns! With so many different versions of the bun to choose from, it’s become a style that can truly be worn for any occasion! The version I’ll be doing today is cute, quick and a little messy, making it a perfect go-to style for days you’re running late!
Step 1 – Gather all of your hair to one side and secure it with an elastic.
Steps 2 & 3 – Take your donut form and place it at the end of your ponytail. (Usually you slide the donut up to the base of your ponytail, but with this style, to get the ‘messy’ look, we’re going to slowly work our way up from the bottom!)
Step 4 – Wrap the ends of your hair around the donut and slowly turning and twisting the donut form inside out until it works its way up the ponytail.
Step 5 – Once your bun is secure, take any layered pieces and pin them with a bobby pin.
There you have it! The messy bun is sure to become one of your favorite looks this fall!


