— Eye Color: Hazel, Light Brown
What better way to embrace the natural colors of a late summer sunset than in your eye makeup? This look incorporates the colors of the warm summer sun, while still being a wearable and fun look for any night out. It’s super simple and extremely eye-catching once completed. Here’s how to get the look.


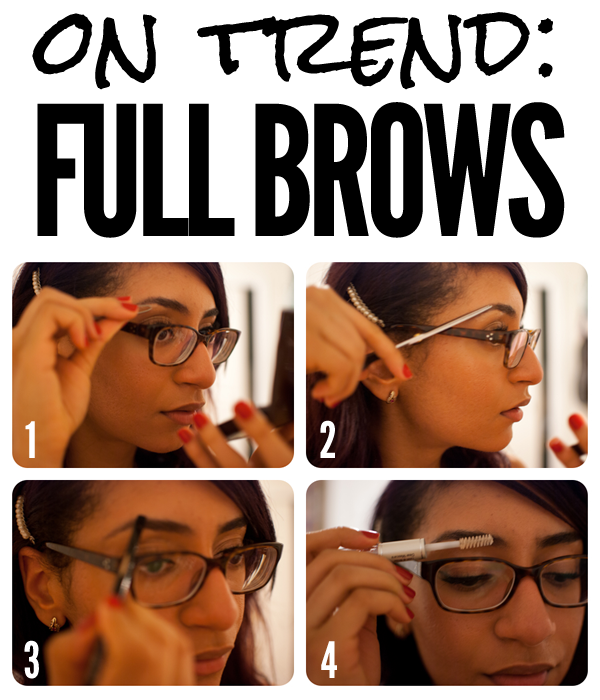
Full eyebrows are all over the cat walk and fashion week. So ladies, put down the tweezers and spend a bit more time between waxing/threading. Full eyebrows can bring a lot of attention to your face and frame your eyes beautifully without much effort. To make them look the best they can be and forward with this thread, follow these easy steps:
1 & 2. Groom them appropriately. Take your time tweezing strays and trimming your brows by brushing them up and carefully following your shape.
3. Using a brow powder a bit darker than your hair color, fill in your brows focusing on the arch and sparse areas. Remember: eyebrows aren’t twins, but close sisters, so they do not have to look exactly like each other.
4. To set them in place, use a clear mascara or eyebrow gel by gently using the and through them. (more…)
False lashes seem to make the world of difference in an eye look, but the application process tends to get messy and complicated. Use these steps to make the task a breeze!


To make that pout extra pouty, follow these steps:

If I could choose one piece of makeup to have with me at all times, it’d be concealer. I have hereditary under eye circles, which I always cover to brighten up my face. Many people struggle with covering their under eye circles, or “bags”. Follow these tips, which work like a charm for me when covering those pesky circles.

Winged eyeliner is definitely a challenging technique to master – but I’ve laid out the steps for you to make the process as easy as possible. You’ll need a black liner of your choice and a black shadow with an angled brush to create the look. I suggest using a gel liner (or any liner that comes in a pot form) to create a wing because it tends to be the easiest and most forgiving of the liners. If you’re really uncomfortable trying this out, start with using a black shadow on an angled brush and making small swipes along your lid. However, for the purposes of this tutorial, I’m going to explain how to get the look using a gel liner. (more…)
Filed in: Eyes, Eyeshadow, Makeup
— Eye Color: Light Brown
Along with purple, green is said to be the most complimentary shade for us brown eyed girls. Because of this, I have created a green smoky eye that is perfect for summer because it has a touch of gold under the waterline. These shades work perfectly with one another to create a summery look that is so beautiful with brown eyes.

Filed in: Eyes, Eyeshadow, Makeup
— Eye Color: Light Brown
Colorful smoky eyes are so fun for summer, and blues are a perfect color for any brown eyed girl to rock. This smoky eye is so simple and vibrant and can be completed in 8 simple steps. Enjoy recreating this mermaid-like, beach inspired smoky eye!

Nicki Minaj always looks fabulous when she is on the red carpet. Her makeup is never not perfect. Whether she’s rocking a bright eyeshadow or a poppy lip color, she‘s on point! Her look is a variety of fun, artistry, and stylishness. To rock her look you must be one word, fierce. Today, I will be showing you how to get one of her most fierce looks- bright teal eyes and a soft pink lip. After this tutorial you’ll be ready to show off your inner Nicki!


Sometimes, I wonder if the small steps in my makeup routine actually make a difference. I decided to test it out -what really works when it comes to eyelash curlers, primers, and mascaras? Are the extra steps (the time spent curling and priming) really making a difference? You tell me! 
No curler, no primer, no mascara: Here, you can see my lashes without any products or tools used. No lash curling, no primer, no mascara!
Curler, no primer, no mascara: Here, you can see what my lashes look like curled, again with no product over top.
No curler, no primer, mascara: Here, you can see what my lashes look like with just mascara.
Curler, no primer, mascara: Here, you can see what my lashes look like curled with mascara, however, without primer.
No curler, primer, mascara: Here, you can see my lashes with primer and mascara, without curling.
Curler, primer, mascara: Here, you can see my lashes with the whole deal – curling, primer and mascara.
At the end of the day, every little step will make a difference. If you have time to curl and prime your lashes in the morning, do both… it can’t hurt! However, if you only have the time (or patience) for one extra lash-related step, I’d say go with the primer!
Filed in: Eyes, Eyeshadow, Makeup, Tutorials
— Eye Color: Light Brown
Purple is my absolute favorite color to play up with my eye makeup – and the color beautifully compliments all brown-eyed girls. Because it’s summer, I like to incorporate bright purples. I also wanted to achieve a natural and wearable look, so I decided to use this bright purple “pop” only in my crease as opposed to all over the lid.
