Give Me Big & Bold Brows a la Cara Delevingne
January 8, 2013

Big, thick brows are definitely “in” right now. Have you seen supermodel Cara Delevingne’s?!
A little trick to quickly make your eyebrows bolder and darker is to use an eye shadow color that is a shade darker than your natural brow color and apply it with any thin eye brush (I used a Sephora angled eyeliner brush).
- Start about ½ an inch away from the start of your brow (near your eye) and fill in any sparse areas with your dark eye shadow.
- Next fill in the top part of your brow (that you skipped before) with whatever small amount of eye shadow is remaining on the brush (so it is not as dark as the rest of your brow in this area).
- Finally, dab a little concealer above and below your brow. This contrast of light with dark will make your brows stand out even more! Be careful not to get concealer on your brow.
- Finish with mascara & liner and voila! Cara Delevinge brows!
Keep in mind that this is not an entirely “natural” look, so make sure you only go super bold for nights out or special events. Add a dark smokey eye, some liner and mascara and you are good to go!

Take Off Your Makeup With Coconut Oil (It’s 100% Natural, Too!)
January 6, 2013

Want a more natural (and cost efficient) way to take off your eye makeup at night? I use coconut oil (pure extra virgin and organic is the best!) and my makeup comes off smoother and quicker than any other expensive makeup remover I’ve used before! If it gets on your skin you don’t have to worry about chemicals leeching in – coconut oil is actually great for helping your skin glow and keeping it moisturized! Plus, it smells delicious!
- Just tab a little coconut oil on your hand to warm. Dip cotton ball in warmed coconut oil.
- Gently “rub” makeup off your eyes, just like you would with a standard eye-makeup remover. Don’t rub too hard, as the skin around your eyes is very delicate and prone to wrinkling. (Who wants wrinkles at 25? Not me!) Instead, blot in sweeping motions. Use as much oil as is needed.
- Finally, take a clean cotton ball and rub off any excess oil left on your skin. Repeat until eye is clean and makeup free. Voila! Works like a charm!
So next time you run out of makeup remover, try this 100% natural home-remedy first (olive oil works as well)!
Smudge No More! The Spoon Trick For Mascara Application
November 17, 2012

You are just finishing your makeup routine when GRRRR!!! In the process of putting mascara on your bottom lashes, some of it has smudged onto the skin beneath your lashes. Your makeup now looks like Elle Woods after Warner dumped her. Great.
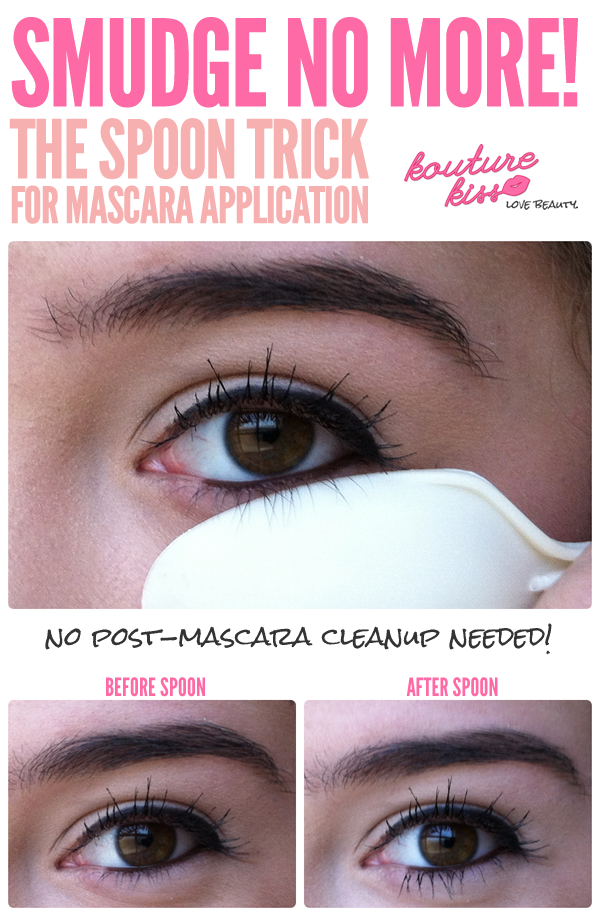
Although a Q-tip can solve the problem, this usually results in some makeup being rubbed off in the process. But there IS a way to avoid this problem all together! The solution? Place a plastic spoon directly underneath your bottom lashes, with the back of the spoon facing out. Then apply your mascara!
The benefits?
- The spoon barrier prevents mascara from rubbing onto your skin.
- Applying mascara on top of a smooth surface helps avoid clumps and prevents lashes from sticking together.
- The whiteness of the spoon helps you see better how much mascara you are putting on, so you can adjust for volume and length!
Super Curl Your Lashes With A Little Heat!
November 5, 2012

Don’t have time to run out to CVS to get a pair of fake lashes before your night out? Then try this simple little trick to instantly get longer lashes!
- Set your blowdryer to low intensity, high heat.
- Place the nozzle of the blow dryer about 2 inches away from the eyelash curler.
- Blow hot air onto the top part of the curler (not the handle) for about 5-7 seconds.
- Important! Safety first. Before you curl, test the curler against your skin to make sure that it is not too hot! The eyelash curler should be fairly warm, but not burning hot. If it is too hot for your liking, let it cool for about 5 seconds.
- Finally curl your lashes at the base, then the middle, and finally the end.
Enjoy your eyelashes magically look longer and more lush!


