The Chinese Staircase (revisited)
December 5, 2013

Looking for a new play on a ponytail that’s unique and fun? Look no further than The Chinese Staircase. This is one of those hairstyles that look extremely complicated, but in fact are quite simple. But, regardless of the skill level needed for this style, either way it will be sure to be a conversation starter! See the steps below!
Step 1: Take a strand from the front of your head and hold apart from the rest of your hair. Gather the rest of your hair to the side and secure with an elastic.
Step 2: Grip the strand with one hand, and using the other wrap the strand around the front of the ponytail and loop it to create a knot.
Step 3: Gather another strand of hair from the ponytail and combine it with the end of your knot. Add a small amount of gel to combine the two pieces to avoid fly-away’s.
Steps 4-10: Repeat steps 2 & 3 on the new strand of hair. Continue these steps as far down as you would like.
Step 11: Secure the bottom with an elastic.
Voila! And there you have it! You’ve created a look that is anything but ordinary. So the next time you’re looking to put your hair in a ponytail, try this version to spice it up!

The Wavy Pony
November 13, 2013

Ponytails are far from boring. A properly executed pony can make an outfit! Personally, I have been rocking this pony a lot lately. It’s cute, fast, and gets my hair out of the way for a busy day.
- Brush your hair
- Carefully brush out any bumps so it makes easier for you when trying to tie your hair
- Bring your hair forward and brush any bumps you might have underneath your hair. (more…)
Curl With A Straightener
November 4, 2013

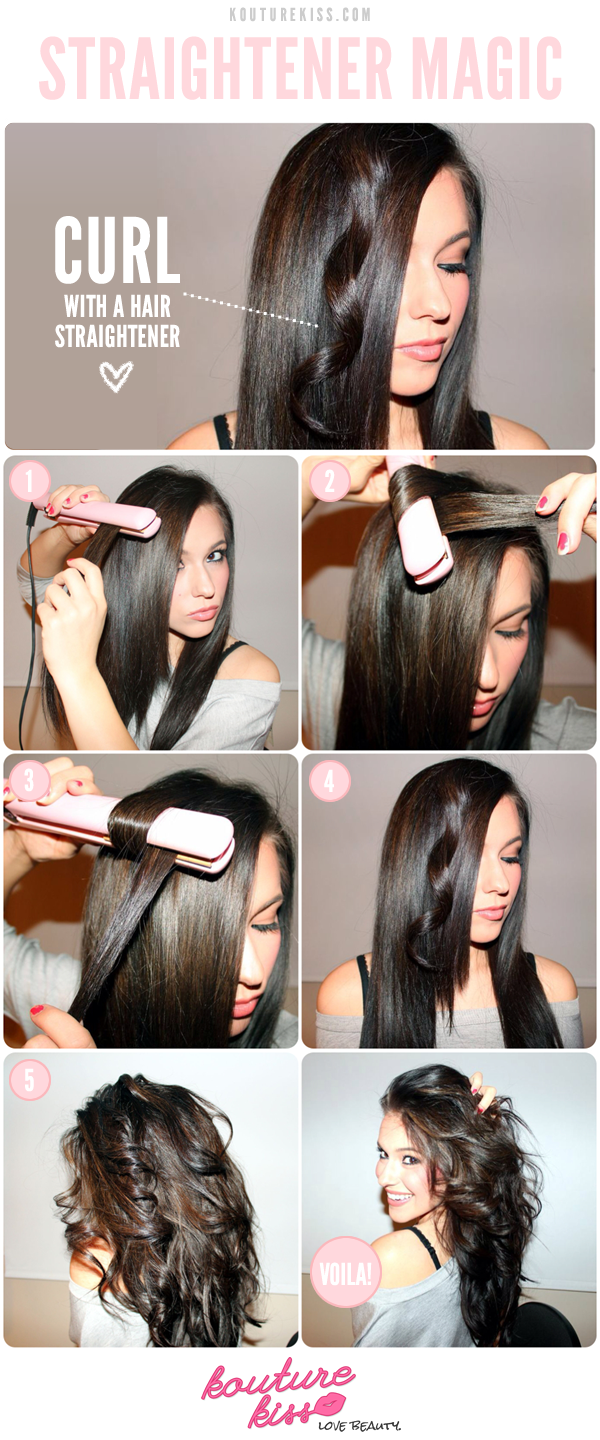
Step 1. Begin with a one-inch section of hair. Smaller sections are easier to work with when curling with a flat iron so I suggest taking one inch at a time even if you have a larger iron.
Step 2. Twist the iron underneath the hair, making sure not to lose the tail. If your not careful, the tail can get caught in between the iron and the rest of your hair and begin pulling. This also causes frizz, so be careful to be as neat as possible during this step!
Steps 3 + 4. Once the hair is wrapped around, it should look like this. Begin pulling downward in a steady, smooth motion for an even curl. The longer you take on this step, the tighter the curl. I wanted voluminous waves so I ran through my sections fairly quick.
Step 5. Continue curling until your entire head is complete. Once done, shake your hair out with your fingers and apply an anti-frizz serum to tame any flyaways. Spritz with a bit of hairspray and voila!
The Messy Bun
October 24, 2013
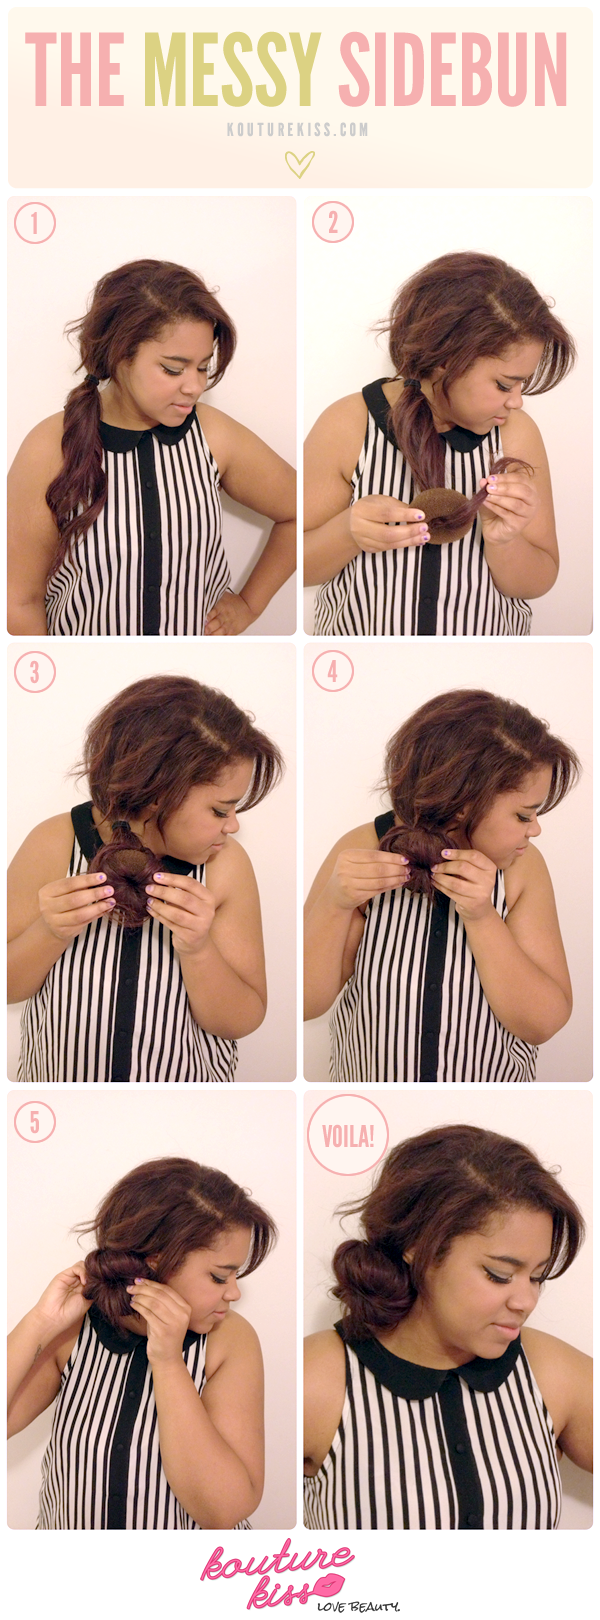
There is no need for me to go in to detail of my love for buns! With so many different versions of the bun to choose from, it’s become a style that can truly be worn for any occasion! The version I’ll be doing today is cute, quick and a little messy, making it a perfect go-to style for days you’re running late!
Step 1 - Gather all of your hair to one side and secure it with an elastic.
Steps 2 & 3 - Take your donut form and place it at the end of your ponytail. (Usually you slide the donut up to the base of your ponytail, but with this style, to get the ‘messy’ look, we’re going to slowly work our way up from the bottom!)
Step 4 - Wrap the ends of your hair around the donut and slowly turning and twisting the donut form inside out until it works its way up the ponytail.
Step 5 - Once your bun is secure, take any layered pieces and pin them with a bobby pin.
There you have it! The messy bun is sure to become one of your favorite looks this fall!


