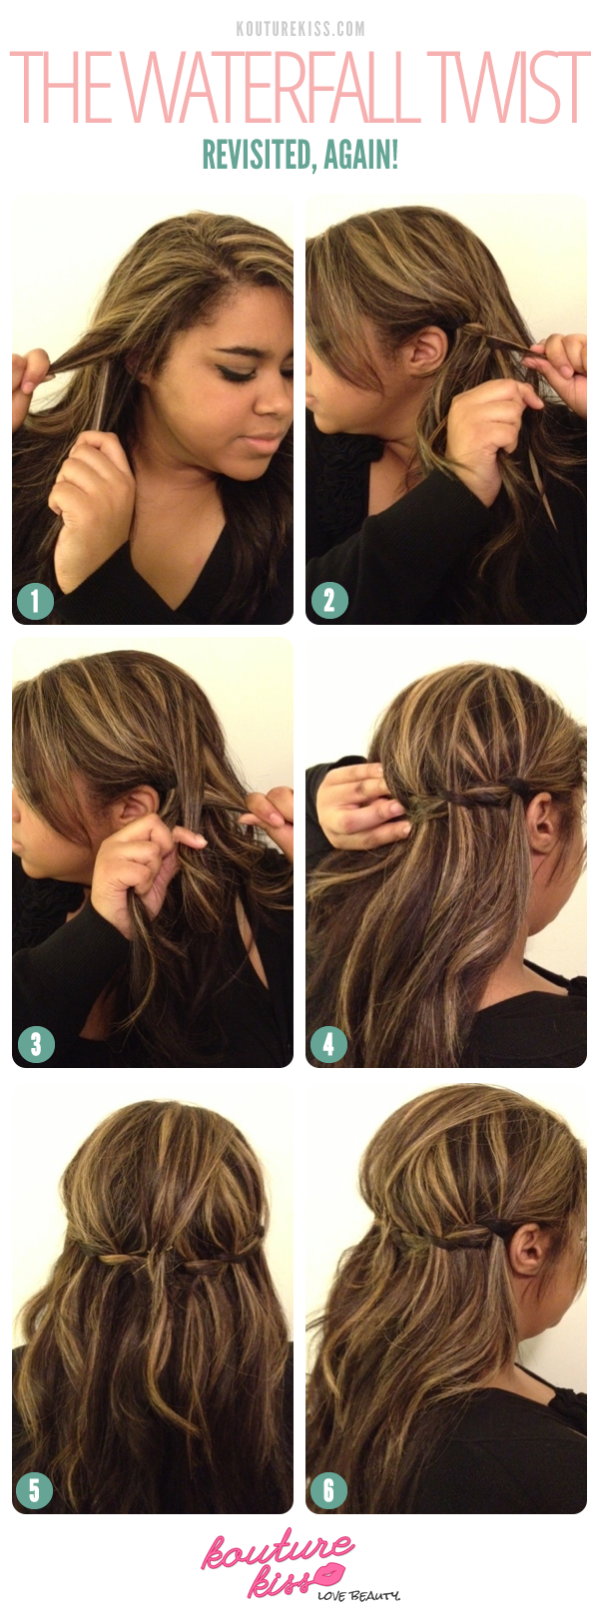
The Waterfall Twist Revisited, Again!
March 26, 2013
The waterfall twist is a unique style that adds a little something special to your typical down hairstyle. This style is also a lot easier than most because for the majority of the time you are working with only two pieces. So follow the steps below to master this pretty, whimsical ‘do’!
Step 1. Start with tangle free hair. Start with a section of hair behind your ear and divide it into two equal pieces.
Step 2. Twist the front section over the back section.
Step 3. Grab a piece of hair from the top and place it between your two first sections. Once the new piece is laying between your twist, pull it tight and keep it out of the way. (more…)

The Waterfall Twist Braid, Revisited!
March 4, 2013

Add an unexpected twist to your everyday tresses! The waterfall twist braid is perfect for amplifying a simple hairstyle. With practice, this easy-to-wear braid can become a go-to style for the upcoming summer months.
- Start by applying a pea-size amount of a finishing serum, like Organix Repairing Awapuhi Ginger Dry Styling Oil, to dry locks; this will make braiding dry hair easier by taming any flyaways.
- Gather a two inch section of hair near the part—you can start at the hairline or behind bangs—and separate that section into two equal pieces.
- Take the piece closest to the hairline and twist it over the second piece.
- Holding the two pieces of hair in one hand, grab a small piece of hair from above the twisted section in your other hand and place it between the first and second pieces. Let the new piece hang loosely—you will never add hair to the two original sections. (more…)
The Large Braided Bun
February 14, 2013

You know those days where no matter what you do, your hair won’t cooperate? It’s frizzy or tangled, and there seems to be no saving it. You could always hide under a rock and hope for better luck tomorrow, or you could try to work with it! The easiest fix when your hair is unruly is to pull it up and tuck it into a bun, but the basic ballerina style can get boring. To change things up a little, you can try a braided version! A four-strand braid can make your hair look extra thick, giving your bun even more oomph!
- Start with your hair in a high ponytail. I like mine to be really tight, but you could definitely rock a looser, more bohemian style too!
- Break your ponytail into 4 even sections. To make it easier to follow, I used a different color hair tie to mark each section.
- Begin the braid by crossing the left-most (green) section over the adjacent (yellow) section. Next, cross the right-most (blue) section over the adjacent (red) section. Then, cross your middle sections, left (green) over right (blue).
The Reverse French Braid
February 13, 2013
Although classic styles are a reliable go-to, every tradition needs a stylish update. A great example is the reverse french braid. While the classic french braid holds it’s own, this fun and quirky braid is a great version! See the steps below!
- Start as you normally would with a french braid by taking a section of hair and dividing it into 3 strands.
- As a second step, rather than placing the pieces over each other like a classic french braid, place them under each other. This is what will give your finished braid the ‘reverse’ look. (more…)


