Contour Action
January 21, 2014

- Begin with a clean, moisturized face.
- Highlight the triangle area underneath your eyes, the center of your forehead down the bridge of nose, and above and below the lip area.
- Contour each side of your forehead, the cheekbone area and the sides and center of your chin.
- Begin blending in the colors with a foundation that matches your skin tone.
- Continue blending with your foundation.
- Now we are going to lock in the highlights by placing a highlight powder in the same areas we placed the highlight cream.
- Lock in the contours by placing a contour powder in the same areas you placed the contour creams.
- Blend the edges together and voila!

Cover It Up! Master Flawless Foundation
January 15, 2014

- Begin with a clean face and pull your hair out of the way with a headband.
- Apply a primer or moisturizer. I used Clean & Clear Dual Action Moisturizer.
- Conceal any under-eye circles you may have. I used Graftobian HD Glamour Creme to do this.
- Also using the Graftobian HD Glamour Creme, conceal any blemishes.
- Apply your favorite foundation. I used MAC Studio Sculpt.
- To make sure this lasts all day and to give your skin a matte finish, apply a powder to set. I used The All Natural Face Vegan Foundation.
- Voila!
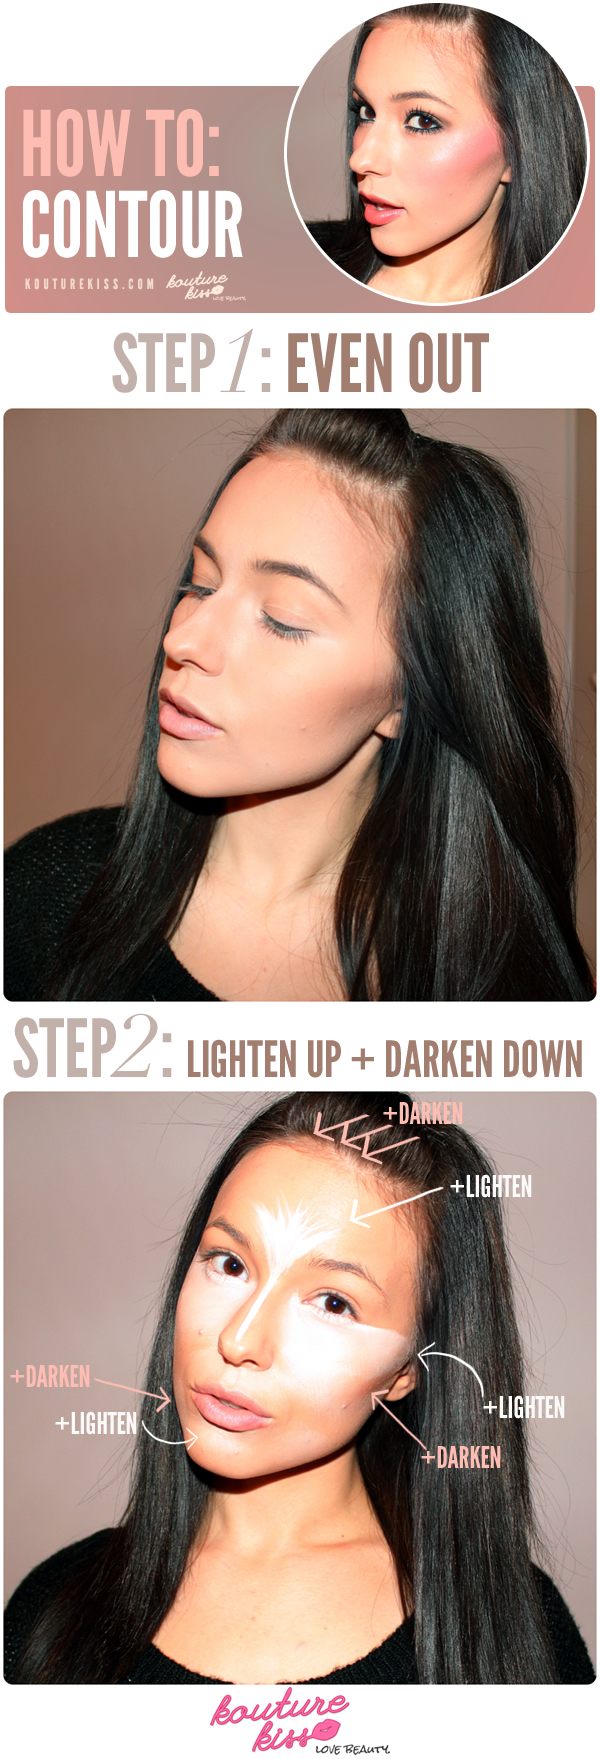
How To: Contour
October 30, 2013

- I begin my highlight and contour routine first by applying a cream highlight. The brighter and whiter the better, since it will fade a bit once you blend it out and apply your setting powder. I used the white concealer from the Coastal Scents Camo Quad (mine is Medium).
- After blending and setting your highlight, go back in with a powder a few shades lighter than your skin tone to reinforce the cream highlights. I also applied a shimmer highlight to the tops of my cheekbones to enhance that area even more. Use a powder a few shades darker than your skin tone to contour the hollows of your cheekbones, the top and sides of your forehead, your chin and the sides of your nose. Continue with the rest of your makeup routine and voila!
The Glam Kitty Halloween Makeup Look
October 30, 2013

It’s that time of year again! The time of year where you can take your makeup to new, terrifying heights! But what i you’re not looking to channel your inner zombie or vampire? Maybe you’re even looking to keep it cute or glam this season. Well, there is nothing easier than the classic kitty look! Follow the steps below to tack this purr-fect look!
- Start with your usual face of makeup. The great thing about this look is it’s a great add-on to your usual routine. Perfect for attending a halloween party after work!
- Using your liquid liner, start on the inner corner of your eye and make a curved line down the direction of your nose. Apply to both eyes.
- Using your liquid liner again, make a curved line across the tip of your nose. Then making a triangle, continue the liner down where your nose meets your top lip. Color in if necessary.
- Continue the liner down the center of your top lip.
- Using the tip of your liner brush, gently place little dots to the left and right of the center line down your lip. (I personally think it looks better than whiskers, but feel free to add whiskers if you’d like!)
- To glam up this look, I applied a bright berry red lipstick.
Voila! There you have it! Halloween doesn’t always have to be ghoulish or gruesome! Debut this glam kitty look at your upcoming Halloween event and you’ll be sure to steal the spotlight! Happy Halloween!


