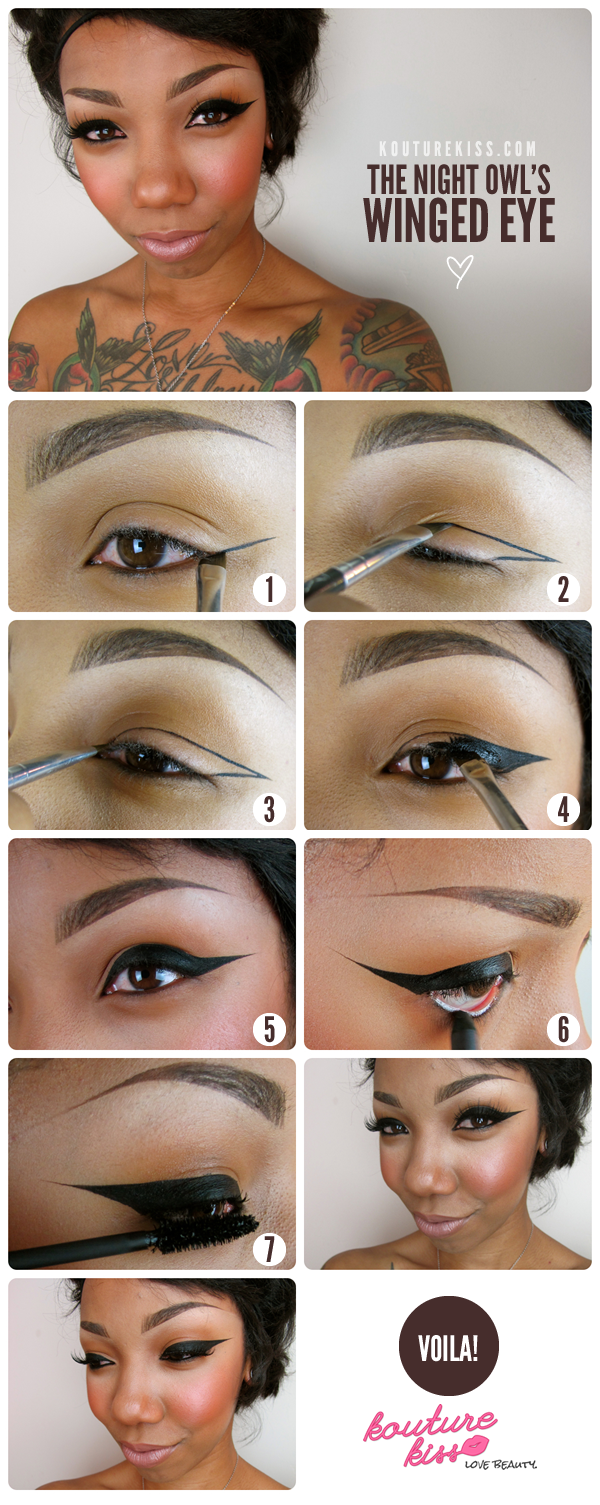
The Night Owl’s Winged Eye
May 13, 2013

Want a dramatic eye, but don’t want to bother with eyeshadow? Try doing a winged liner look, but take it a little further….
I used Inglot gel liner in #77, and angled MAC brush #263. I love this liner because it’s the blackest I’ve ever used and waterproof. This is my favorite brush because it’s very precise, and the synthetic hairs give a smooth and thin application.
Step 1. Starting with a matte eye, use your synthetic angle brush with the tip pointing away from the eye, to lay down your first line.
Step 2. Go back to the line, and drag the liner across the entire lid to the inside of the eye. The bigger the better, dont be scared! It’ll feel weird but it’ll look beautiful! Connect with the front of the eye. (more…)

Getting Lippy! Bold Lips For The Dark Skinned Girl
May 1, 2013

In order to “master” something, you need to take a little time to perfect what you’re going for. Quick makeups are great, but like anything, perfection takes time!
- Start with a clean lip. Wipe off any chapstick or oily residue.
- Outline top lip with a red lipliner (a thick line), I used Cherry from MAC.
- Outline bottom lip. (more…)
Fill Your Brows To Perfection!
April 30, 2013

Step 1: Begin with naked, brushed brows.
Steps 2 & 3: Outline the shape you want with an eye liner brush. Fill in the outer part of the brow to give it a sharper arch with the same brush. (more…)
Cheek Perfection! Get The Perfect Cheek With 3 Easy-to-Master Products
April 10, 2013

Between contouring, highlighting, and other beauty buzzwords right now it can seem a bit confusing when it comes to cheeks! Pulling out all the stops is fun for special occasions but on a daily basis it’s nice to simplify. Here are 3 products to add to your routine to get that perfectly sculpted cheek everyday!
- To start, you’ll need a matte bronzer, a shimmery highlighting powder, a blush, and an angled brush and a blush brush.
- Start with your angled brush, swirl it into your matte bronzer and apply in a line to the hollows of your cheeks. Sweep it back and forth so it’s blended.
- Dust off your same brush and sweep your highlighting powder on the tops of your cheekbones.
- Take your blush brush and apply your colour starting on the high point of the “apple” of your cheek. Don’t know where the apple of your cheeks are? Just smile! That round higher “cheeky” part that goes up when you smile? That’s the apple! The majority of your blush goes here.
- Now blend your blush back towards your temples. Don’t reload your brush, just use the remainder for this. This will blend everything together!
- Voilá! The perfectly sculpted cheek!


