Cover It Up! Master Flawless Foundation
January 15, 2014

- Begin with a clean face and pull your hair out of the way with a headband.
- Apply a primer or moisturizer. I used Clean & Clear Dual Action Moisturizer.
- Conceal any under-eye circles you may have. I used Graftobian HD Glamour Creme to do this.
- Also using the Graftobian HD Glamour Creme, conceal any blemishes.
- Apply your favorite foundation. I used MAC Studio Sculpt.
- To make sure this lasts all day and to give your skin a matte finish, apply a powder to set. I used The All Natural Face Vegan Foundation.
- Voila!

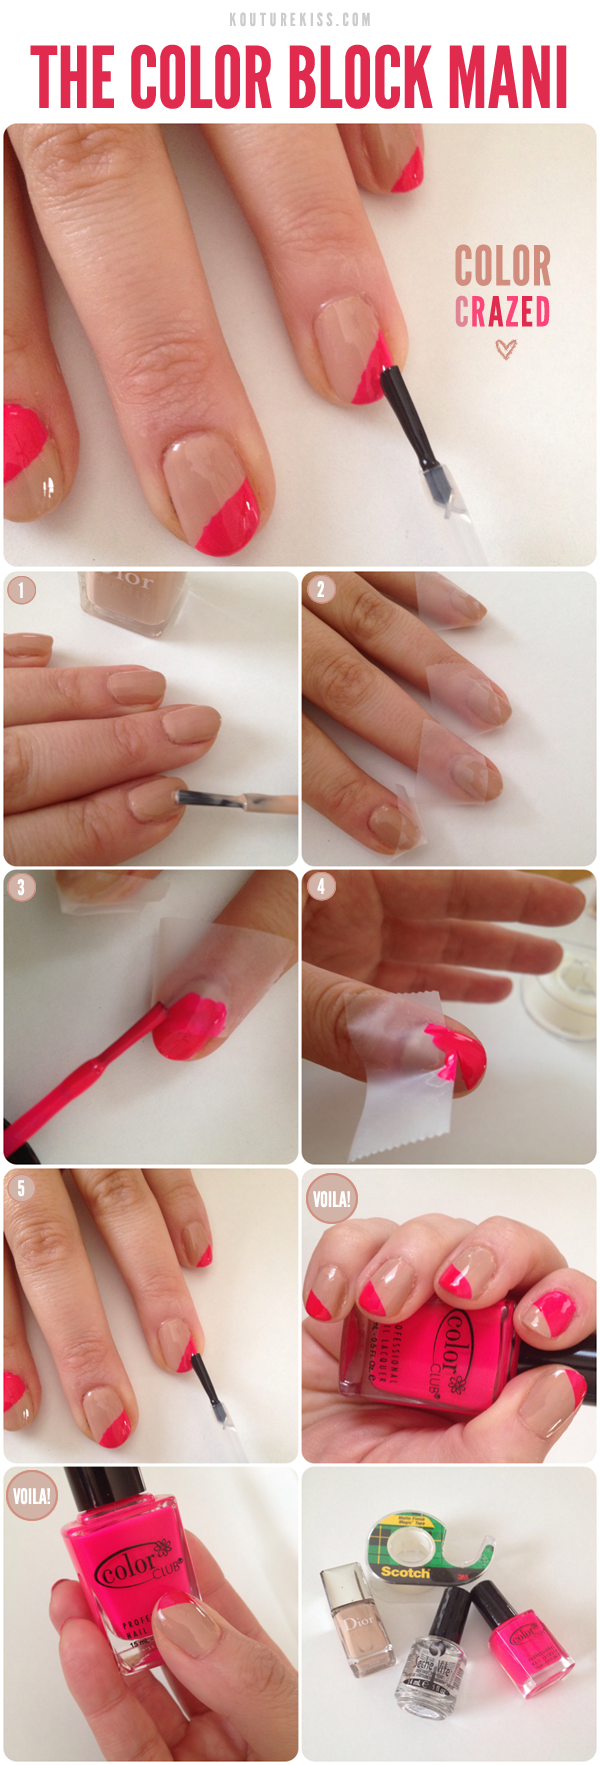
The Color Block Mani
January 8, 2014
- Paint your nails with one shade. Let them dry completely! The trick to mastering this technique is to be patient. They need to be totally dry.
- Apply the tape to your nails in any angle you prefer. The tape will cover the area of the nail you don’t wish to paint. Make sure to press down completely so you get a super sharp line!
- Apply a thick coat of your contrasting polish!
- Remove the tape in one swift motion while your nails are still wet!
- Wait a few minutes and once it’s mostly dry, seal with a clear coat. (more…)
The Looped Twist
January 7, 2014

- Begin with your hair in it’s natural texture. This hairstyle works best if you begin with a middle part, but you could do a side part as well.
- Pull all of your hair into a side ponytail.
- Section the hair above the ponytail into two parts.
- Pull the ponytail backwards through the hole you just made.
- Gently tighten the ponytail to make sure it’s secure
- Gently pull the hair above the ponytail to loosen it up a little.
- Wrap another ponytail around the hair about 2 inches below the one above it (depending on how thick your hair is), and make another hole for the hair to go through.
- Pull the hair through and gently pull just like you did before.
- Continue doing this until you reach the end, and… voila!
The Glitter Fade Mani
January 6, 2014

- Begin with a good base coat (I used Essie’s Good To Go Top Coat). Always begin with a base coat underneath your polish to prevent them from discoloration!
- Apply the first coat of nail polish. You can use any color you want- I chose this beautiful pale pink which is Essie’s “Ballet Slippers”.
- Apply the second coat of your color to make sure there you can’t see any of your nail peeking through.
- Apply a glitter (again-any color you want, but I went with Essie’s “Set In Stones”) to just the base of each nail.
- Before the glitter dries, apply your top coat to drag the glitter up into a gradient effect.
- Clean up any mistakes you made and…
- Voila!


