Eyelash Curling vs. Eyelash Priming – What Really Makes A Difference?
June 25, 2012
Sometimes, I wonder if the small steps in my makeup routine actually make a difference. I decided to test it out -what really works when it comes to eyelash curlers, primers, and mascaras? Are the extra steps (the time spent curling and priming) really making a difference? You tell me! 
No curler, no primer, no mascara: Here, you can see my lashes without any products or tools used. No lash curling, no primer, no mascara!
Curler, no primer, no mascara: Here, you can see what my lashes look like curled, again with no product over top.
No curler, no primer, mascara: Here, you can see what my lashes look like with just mascara.
Curler, no primer, mascara: Here, you can see what my lashes look like curled with mascara, however, without primer.
No curler, primer, mascara: Here, you can see my lashes with primer and mascara, without curling.
Curler, primer, mascara: Here, you can see my lashes with the whole deal – curling, primer and mascara.
At the end of the day, every little step will make a difference. If you have time to curl and prime your lashes in the morning, do both… it can’t hurt! However, if you only have the time (or patience) for one extra lash-related step, I’d say go with the primer!

Hot Pink Lips for the Olive Skinned Girl
June 23, 2012
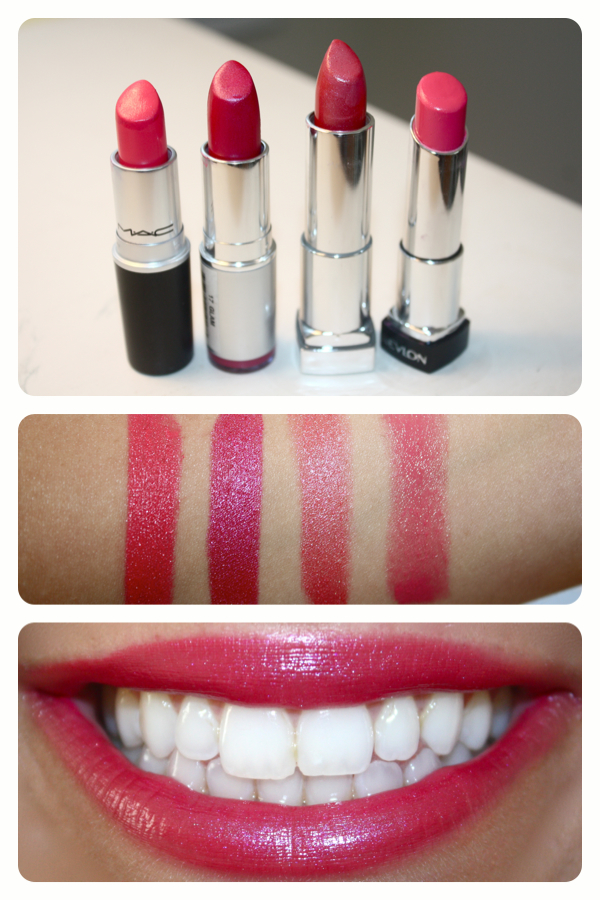
Olive skinned girls have no problem pulling off the hot pink lip look as long as the pinks are warm-toned. This is important because warm tones will work with the olive skin color. A good way to check to see that you are purchasing a good pink is to swatch it on your arm. A good pink will compliment the tones of your skin, rather than clash against them.

Colors, left to right: MAC Impassioned, Jane Glam, Maybelline Pink Peony, Revlon Lip Butter in Sweet Tart
In case you are unsure how to judge what clashes and what compliments, I swatched four hot pink colors that will work for any olive skinned girl. The hot pink lip is the perfect option when you are on-the-go during the summer. It works in the same way that a red lip does in the winter months – a sophisticated look that works best with simple makeup, since the lips are such a powerful element to the look. (more…)
A Purple Smoky Eye for the Brown Eyed Girl
June 21, 2012
Purple is my absolute favorite color to play up with my eye makeup – and the color beautifully compliments all brown-eyed girls. Because it’s summer, I like to incorporate bright purples. I also wanted to achieve a natural and wearable look, so I decided to use this bright purple “pop” only in my crease as opposed to all over the lid.

- Start by applying a purple base to the lid and a bright white base to the inner corner. These base colors do not need to match any future colors you will be applying – they will mainly serve to make the shadows more pigmented. Use any liner or cream eyeshadow you have in your collection for this step. (more…)
How to Find Your Eyebrow Arch
June 18, 2012
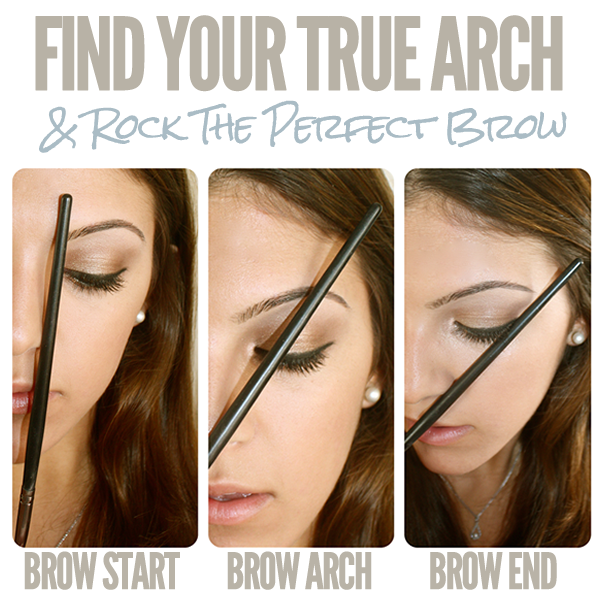
Ever wonder exactly where your arch is? Given your particular facial structure/shape, there is a specific spot where your where your eyebrows should start, end, and arch. The trick is not only simple but requires practically nothing – just a straight edge of some sort (pencil, end of a makeup brush, even a ruler!).

To find where your brows should start:
Use your straightedged tool and align it to the bottom tip of your nose. Straight up from this point is where your brows should start.
To find where your brows should arch:
Use your straightedged tool and place it on the tip of your nose. Angle it directly across the center of your pupil. The place where the straightedged tool meets your brow is the ideal spot for your brow to arch.
To find where your brows should end:
Use your straightedged tool and again align it with the bottom of your nose. This time, angle the straightedged tool in the direction of the outer corner of your eye. Where this angle meets your brow is the ideal spot for your brow to end. As you can see above, my brow is not “ideally” long enough based on the technique, so I should aim to grow it slightly longer.
Before you run to the salon to get your brows done, try this technique. Still can’t find your arch? Try letting your eyebrows grow in naturally – full length, width, and all! This will help you find your most accurate and natural arch.


