Milkmaid Braids
October 4, 2012
Milkmaid braids are making their mark in the beauty trend department! With tons of varieties to choose from, it’s a little tough to decide on a version that fits you. Keep in mind, they can be dressed up and polished for a glam appearance or worn loose and messy for a casual, laid back look. Whichever you prefer, follow the steps below to master milkmaid braids!

- Have hair down and brushed out to remove any tangles. Tip: Your hair can be wavy, curly or straight. This hair style works well on all!
- Take a section of hair from underneath your hair. Try to grab the section that sits behind your hair. (more…)

The Perfect Cat Eye (Using Liquid Eye Liner)
October 2, 2012
The cat eye is among the most popular makeup trends out there and with liquid liner it’s easy to achieve whether you’re aiming for a subtle version or full on drama, follow the steps below to get the purr-fect results every time!

- With liquid eye liner, the worst thing you can do is drench your brush! Dip the brush and be sure to dab off any excess liner. (For this tutorial i’m using e.l.f.’s liquid liner.) (more…)
The Double Rope Braid Bun
September 28, 2012
The Double Rope Braid Bun is a simple, yet chic way to style your hair for any season! While the name may remind you of a classic childhood activity, luckily the steps aren’t quite as difficult. The steps are actually quite simple once you get the hang of it. (If you need a quick refresher, see the similar ‘Unicorn Braid’ tutorial to review the basic beginner steps!) Once you’ve got the direction of the ‘twisting’ down, follow the steps below to take it to the next level!

Step 1 - Gather hair into a ponytail.
Tip: You can customize your end result by gathering hair into a high or low ponytail. This will change up the end look!
Step 2 - Divide ponytail into two sections. Take one section and clip back out of the way. (more…)
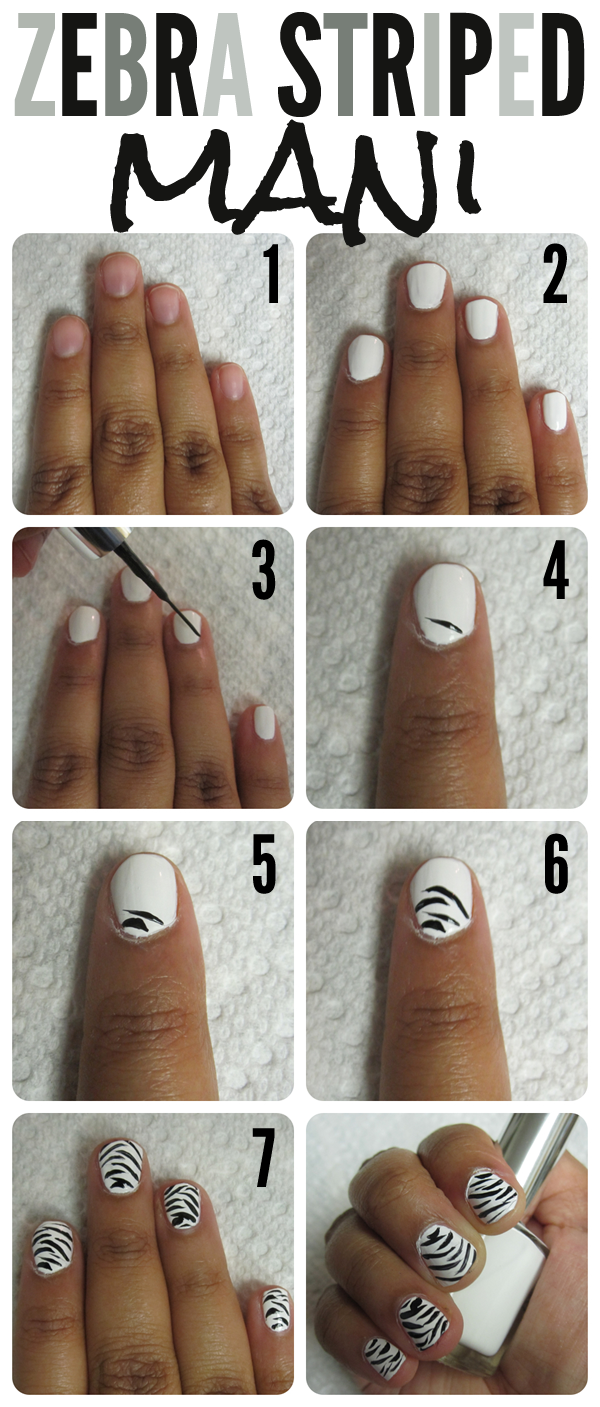
Zebra Striped Manicure
September 4, 2012

Nail art is an excellent way express yourself. Whether your feeling conservative or bold, you can let your mani do that talking. Every girl has a day where the french manicure just doesn’t cut it. When you feel like taking a walk on the wild side, follow the steps below to give yourself a zebra striped manicure- at home!
Step 1. Select a base color. The great thing about this mani is that it can be done in many ways. In this tutorial I am going to stick to the classic white with black stripes, but feel free to substitute the white for pink, purple, blue or any other color!
Step 2. Once the base color is dry, begin your stripes! You will need to use the thin nail art brushes for this. The key to stripes is gentle even strokes on each side of the nail. Be sure to angle them out in the same direction.
Step 3-6. Repeat stripes on as many nails as you’d like.
Step 7. Once your stripes are dry, finish with a thick top coat.
Voila! You now know how to give yourself a zebra striped manicure. Keep in mind when doing this with your opposite hand, it can get a little tricky. Just take it slow and you’ll be on your way to earning your stripes in no time!


