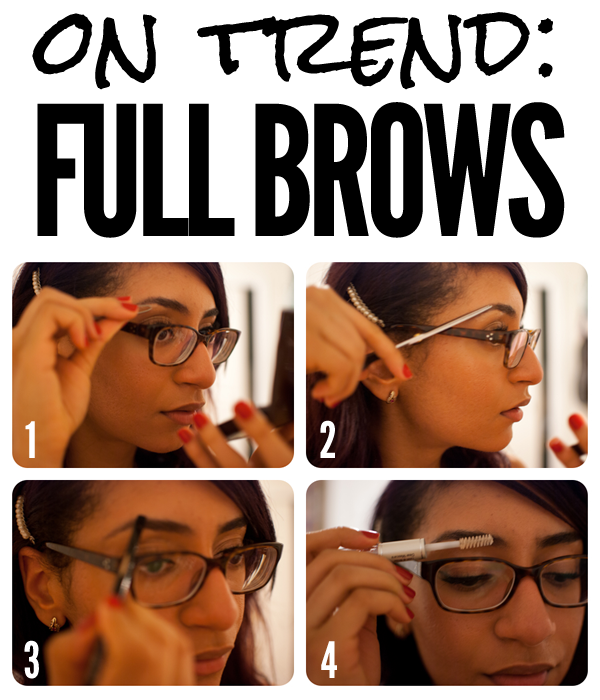
Full eyebrows are all over the cat walk and fashion week. So ladies, put down the tweezers and spend a bit more time between waxing/threading. Full eyebrows can bring a lot of attention to your face and frame your eyes beautifully without much effort. To make them look the best they can be and forward with this thread, follow these easy steps:
1 & 2. Groom them appropriately. Take your time tweezing strays and trimming your brows by brushing them up and carefully following your shape.
3. Using a brow powder a bit darker than your hair color, fill in your brows focusing on the arch and sparse areas. Remember: eyebrows aren’t twins, but close sisters, so they do not have to look exactly like each other.
4. To set them in place, use a clear mascara or eyebrow gel by gently using the and through them. (more…)
Filed in: Nails
— Eye Color: Dark Brown — Hair Color: Dark Brown — Skin Type: Dry — Skin Color: Olive — Hair Length: Long — Hair Texture: Kinda Curly — Undertones: Yellow

With manicure trends balancing on a line of bold and just plain crazy, it’s hard to find a style that is fun, practical and most improtantly appropriate for a variety of settings! There are few manicures that fit the criteria above like the faux caviar manicure. Trendy, eye catching and customizable! Follow the steps below to master this ‘appetizing’ nail trend!
Preparation: For this nail trend you can buy the Caviat Caviar nail kit (available at Sephora for $25) or you can be resourceful and check in to your local craft store for tiny beads! I went to Michaels and found a jar of tiny craft beads (available in a variety of colors for $8) which worked just as good! The choice is yours!
1. Gather your prep materials.
2. Give yourself a base coat. In this example I’m using black.
3 & 4. On the second coat, wait a few seconds until nails are tacky, not wet. Then, dip your nails into the ‘caviar’ beads. Once they are on your nail, press firmly to shape the nail and to prevent any loose beads from falling off.
5, 6, & 7. Continue step 2 on as many nails as you’d like. For a subtle look, try adding the beads to just the ring finger. For a bold statement, do all nails except the thumb! If you’re fearless, do all five fingers!
8. Once beads are on, add a thick clear top coat! This will hold the beads together so you won’t have any coming off throughout the day/night!
The key to fabulous results is to let this dry completely! If the beads are securely on and finished with a tight top coat, there is nothing stopping you from making your caviar nails the main course at your next few dinner parties!
Although, I am not quite fair right now (hi, summer, how are you?), I still abide by the fair skin colour rules – don’t go too light, yet don’t go too dark… unless you want to. The fact is very light and very dark colors can wash us out beyond belief, therefore I always stick to four families: Berries, Reds, Deep Pinks and Browns. These add just the perfect hint of colour that will brighten up your complexion. My favorite are:


Skrillex is a DJ who is known for his quirky hairstyle where a portion of your hair is shaved off. This hairstyle has become quite popular with women with singers such as Rihanna, Avril Lavigne and Ke$ha also following in his footsteps and shaving one side of their hair. As much as the style is cool and different there are many people out there (myself included!) that would love to wear this style but definitely don’t want to shave their heads! Follow the tips below to can achieve a faux Skrillex hairstyle with a pop of berry on your lips. (more…)
Filed in: Nails

Let’s bring out our inner child for just a moment, the one who didn’t colour inside of the lines, and let them run loose on your nails. This tutorial allows you to have some fun, in terms of being a bit more free with the design. This nail tutorial is a bit more difficult because you have to forget everything you’ve learned about painting your nails: keeping everything neat and organized. Here, you must keep everything free and fluid, forgoing the notion of being perfect. I’m going to share some tips on perfecting this imperfect nail art.
Filed in: Curls, Hair, Heated Tool Styling, Styles
— Eye Color: Dark Brown — Hair Color: Dark Brown — Skin Type: Dry — Skin Color: Olive — Hair Length: Long — Hair Texture: Kinda Curly — Undertones: Yellow

The flat iron is the go-to hair tool for many of us. Ideal for handling frizzy situations and when paired with the proper products, can give you pin straight locks even on the hottest summer days! What most girls don’t know is that with the right technique, your flat iron can give you bouncy curls as well! So ditch the curling iron, and follow the steps below to see how you can turn your flat iron into a one stop miracle tool! (more…)

The sidebun is a classic and elegant hairstyle that has been around for a long time. It is an easy and simple way to make a look more interesting and feminine and is perfect for hot summer days when you want your hair out of your way.
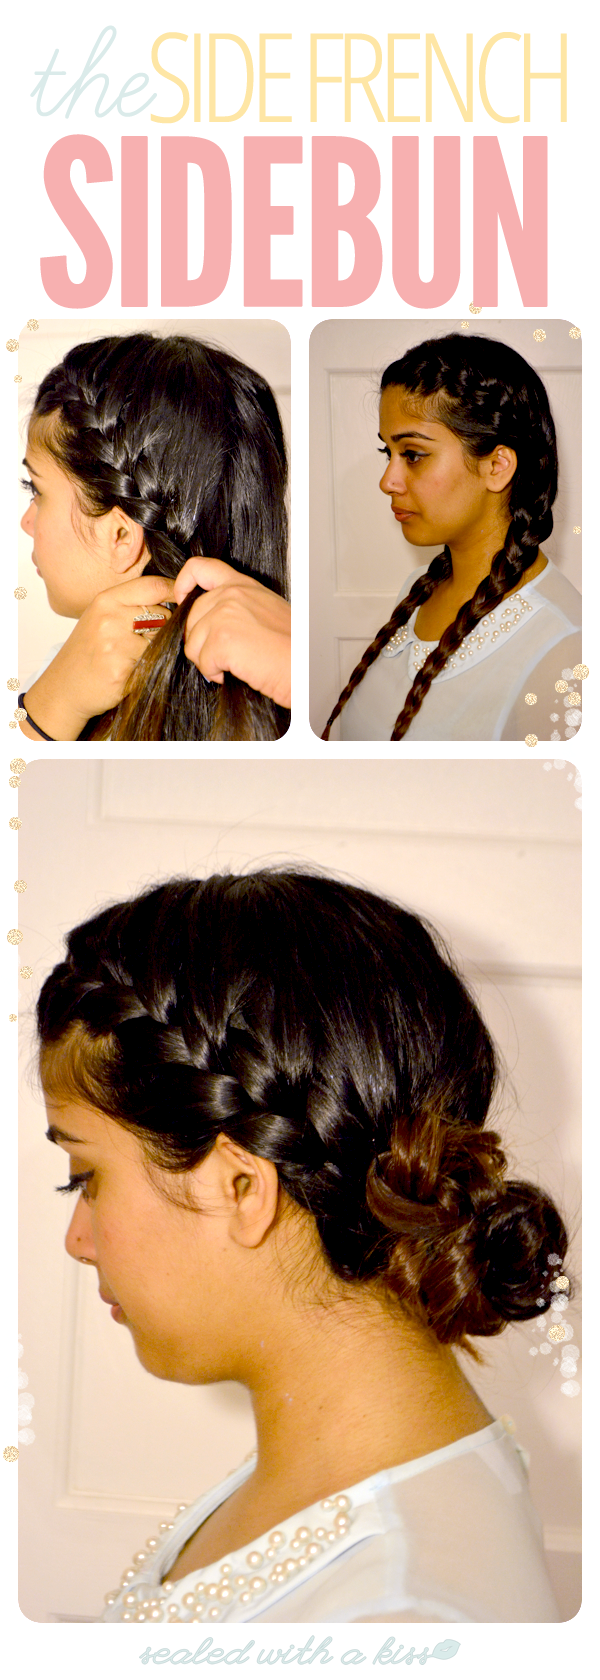
There are many different ways you can rock a sidebun and I have decided to show four different ways you can do so. My second look is the elegant side french braid sidebun. It’s easy to master, and perfect for both day and night settings.

The sidebun is a classic and elegant hairstyle that has been around for a long time. It is an easy and simple way to make a look more interesting and feminine and is perfect for hot summer days when you want your hair out of your way.
There are many different ways you can rock a sidebun and I have decided to show four different ways you can do so. My first look is the classic slick sidebun which is perfect for the evening with a pop of red lipstick:
I don’t know about the rest of you girls, but I tend to throw my hair back in a ponytail every morning for class. It’s simple, chic, and best of all, it doesn’t get in your face all day. However, it’s fun to spice up the everyday ponytail and give it a fun and feminine twist, a la a braid. It only requires an extra minute in comparison to your traditional pony and makes a noticeable difference. Here’s how to achieve the effortless, casual look.

False lashes seem to make the world of difference in an eye look, but the application process tends to get messy and complicated. Use these steps to make the task a breeze!

Go for the ultra glam look and let your nails do the talking with glitter tipped nails. It is super simple and with a few speedy steps you’ll be ready to show off this unique mani!

Happy mani-curing, beauties!
— Eye Color: Dark Brown — Hair Color: Dark Brown — Skin Type: Dry — Skin Color: Olive — Hair Length: Long — Hair Texture: Kinda Curly — Undertones: Yellow
All things ‘vintage’ are in high demand. This doesn’t mean you have to limit yourself to clothing and accessories, you can also apply the look to your hair. The vintage bun is a great option if your looking for an easy, elegant up-do. With a few added steps, you can give your average bun a glamourous kick. Follow the steps below to see how!

There you have it! With a little (or a lot!) of volume and key accessories, you’ve taken your typical bun and gave it a vintage glam appeal!