Filed in: Cleansing Routines, Skin
The importance of washing your brushes is, well, important! If you use them everyday, there could be a colony of bacteria having a fun time in the expense of your face (breakouts, anyone?). Makeup brushes should be washed at least once a week, maybe more depending on the products – like type of foundation, blush, etc. The best way is to use a mild soap and warm water. This will keep your brushes soft and in great shape for years to come. Your skin will thank you later.

— Eye Color: Hazel, Light Brown — Skin Color: Olive

A key way to make your eyes stand out is by mastering the smokey eye. Another key way is to find out what colors really make your eyes pop. As a fellow member of the brown eyed community, taupes and greens are top tier to making those babies look their best. In this tutorial, I chose a deep taupe and as an accent a wonderful ligher taupe to add some dimension.
Filed in: Hair

With hair trends arising on a daily basis, at times it may seem difficult to keep up. When in doubt, it’s always a great idea to look to the past for inspiration. Amongst the many beauty icons is actress, Farrah Fawcett. With her hair as a memorable trademark, there’s no secret to why her ‘do’ will always be a classic. Follow the steps below to master this timeless look!
Filed in: Nails

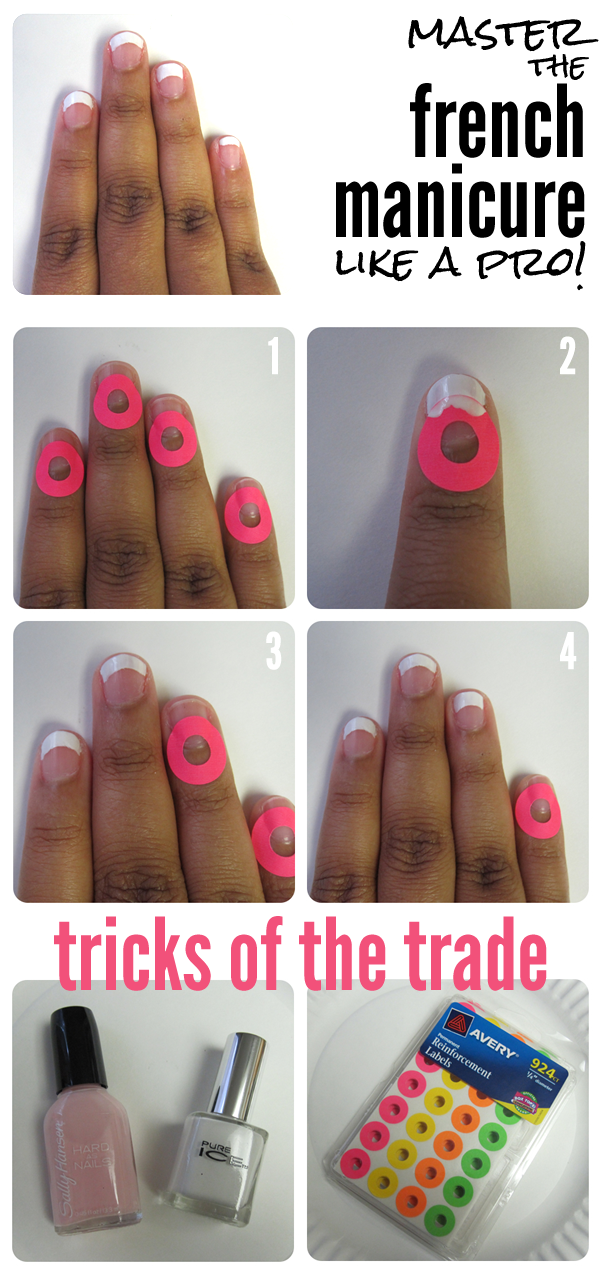
The french manicure has been reinvented countless times. But in the end, the classic is pretty hard to beat! It’s girly, clean and goes well with just about any outfit! Although this french manicure requires practice, it’s anything but impossible to achieve on your own. So why pay at the salon when you can do it yourself? Grab the proper tools and follow the steps below to french manicure like a pro! (more…)
Filed in: Nails

It’s been a hot summer so far, and what better way to spread the heat than to fire up your nails?
— Eye Color: Hazel, Light Brown
What better way to embrace the natural colors of a late summer sunset than in your eye makeup? This look incorporates the colors of the warm summer sun, while still being a wearable and fun look for any night out. It’s super simple and extremely eye-catching once completed. Here’s how to get the look.


Like this? Check out The Sidebun Series Look #1 & Look #2!

All you need for this look is:
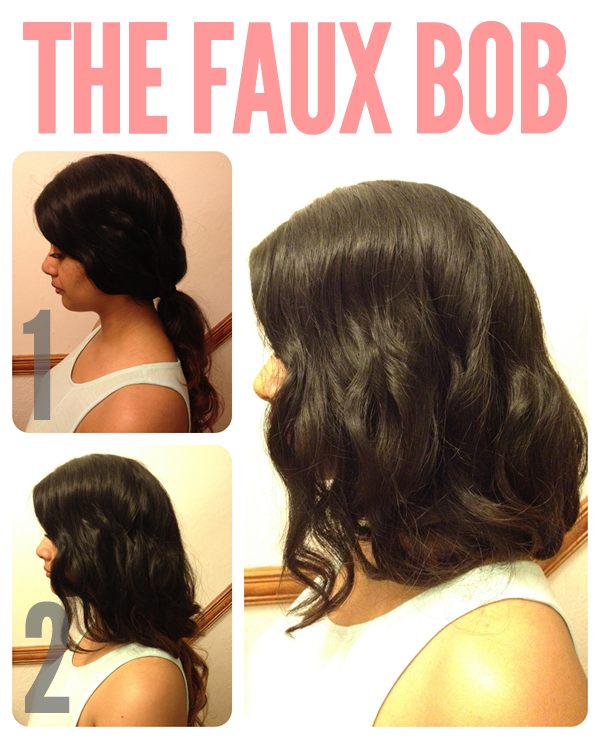
I have very long hair, but whenever I see a girl with glamorous Olivia Palermo style locks I can’t help but feel hair envy! However, I have never been able to muster the courage to actually chop off my locks. The faux bob is perfect for those who want to change up their everyday look and without having to actually cut it. (more…)
Filed in: Nails
— Eye Color: Dark Brown — Hair Color: Dark Brown — Skin Type: Dry — Skin Color: Olive — Hair Length: Long — Hair Texture: Kinda Curly — Undertones: Yellow

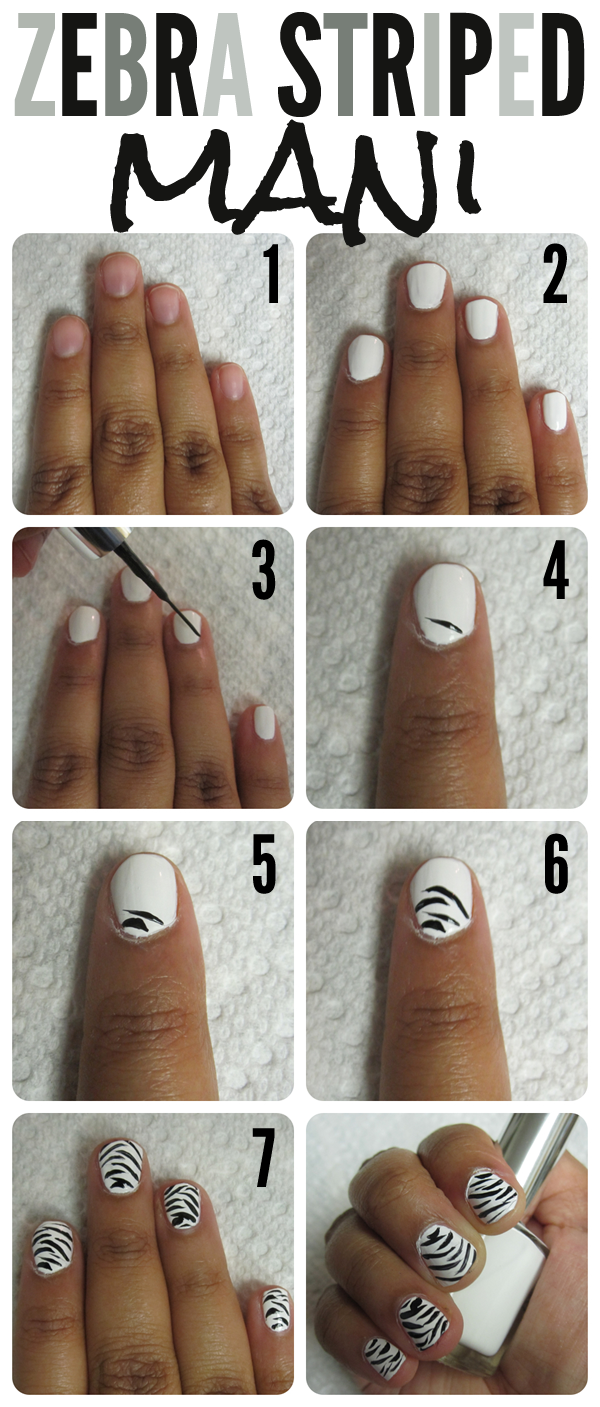
Nail art is an excellent way express yourself. Whether your feeling conservative or bold, you can let your mani do that talking. Every girl has a day where the french manicure just doesn’t cut it. When you feel like taking a walk on the wild side, follow the steps below to give yourself a zebra striped manicure- at home!
Step 1. Select a base color. The great thing about this mani is that it can be done in many ways. In this tutorial I am going to stick to the classic white with black stripes, but feel free to substitute the white for pink, purple, blue or any other color!
Step 2. Once the base color is dry, begin your stripes! You will need to use the thin nail art brushes for this. The key to stripes is gentle even strokes on each side of the nail. Be sure to angle them out in the same direction.
Step 3-6. Repeat stripes on as many nails as you’d like.
Step 7. Once your stripes are dry, finish with a thick top coat.
Voila! You now know how to give yourself a zebra striped manicure. Keep in mind when doing this with your opposite hand, it can get a little tricky. Just take it slow and you’ll be on your way to earning your stripes in no time!
Filed in: Braids, Hair, Styles
— Eye Color: Dark Brown — Hair Color: Dark Brown — Skin Type: Dry — Skin Color: Olive — Hair Length: Long — Hair Texture: Kinda Curly — Undertones: Yellow

If you’re looking for a new twist on the french braid, look no further than the zig-zag braid. With the result looking very complicated, you’d be surprised that the execution is quite simple. The key is understanding how to capture the zig-zag look. Essentially what you’re doing is a half french braid in one direction and then take the same braid back across the other direction. Confused yet? Follow the steps (and images!) below to conquer this quirky ‘do’!
1. Start on one side of your head and begin to french braid as normal (with 3 pieces).
2. When you begin to gather hair, take only from the top. This means on your second piece, you will NOT take hair from underneath. Only gather more hair from the top of the braid.
3. Once you’ve french braided across to the other side of your head, braid a few strands and then continue your french braid below your first. (more…)
Filed in: Hair, Heated Tool Styling

Fine haired girls have the hardest time achieving volume, only because we have so much less hair to work with. However, there’s tricks and tips to beat the problem and it’s a super easy one to solve!
Before the blowout….
Filed in: Braids, Hair, Styles
— Eye Color: Dark Brown — Hair Color: Dark Brown — Skin Type: Dry — Skin Color: Olive — Hair Length: Long — Hair Texture: Kinda Curly — Undertones: Yellow

The french braid is a classic hairstyle that can be dressed up or worn casual. This style is also very versatile and has many different versions. Once you’ve mastered the classic, you’ll have no problem with the inside out french braid. To get started, follow the steps below!
1 & 2. Start as you normally would with a french braid with straight loose hair, divided into 3 strands.
3-6.Instead of crossing the pieces over each other like a normal french braid, cross them under each other. This is key in achieving the ‘inside out’ look.
6 & 7. Continue the braid as you normally would, with each strand, gather hair from beneath and incorporate into your braid (remember to place each strand UNDER the other, not on top!)
8. Once you’ve finished your braid, secure with an elastic.