Fired Up Triangle Mani
September 14, 2012

It’s been a hot summer so far, and what better way to spread the heat than to fire up your nails?
- You’ll need a clear base coat, yellow, orange and red nail polishes, as well as a clear top coat.
- The first thing you want to do is apply the clear base coat to protect your natural nails.
- Once this is done, paint your nails yellow.
- Now comes the tricky part, you want to make upside down triangles at the tips of your nails with the red nail polish. The trick is to try and make each nail have the same size triangle – or close to the same size, but this can be adjusted with the next step.
- You now want to use your orange nail polish and border the triangle with it. You can use a thin border or a thick border depending on how you like your nails. What’s good about using this orange border is that it can also hide any of the places where you may have messed up the triangle. After this, apply a clear top coat to your new manicure and keep things hot!

Zebra Striped Manicure
September 4, 2012

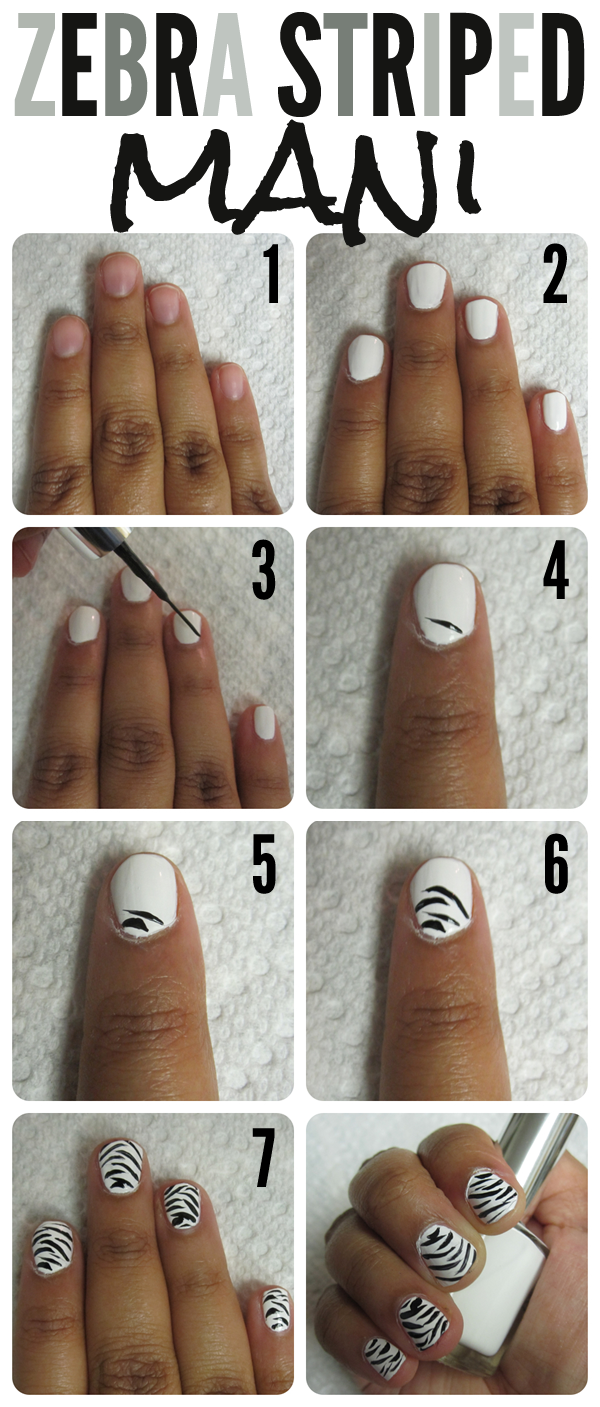
Nail art is an excellent way express yourself. Whether your feeling conservative or bold, you can let your mani do that talking. Every girl has a day where the french manicure just doesn’t cut it. When you feel like taking a walk on the wild side, follow the steps below to give yourself a zebra striped manicure- at home!
Step 1. Select a base color. The great thing about this mani is that it can be done in many ways. In this tutorial I am going to stick to the classic white with black stripes, but feel free to substitute the white for pink, purple, blue or any other color!
Step 2. Once the base color is dry, begin your stripes! You will need to use the thin nail art brushes for this. The key to stripes is gentle even strokes on each side of the nail. Be sure to angle them out in the same direction.
Step 3-6. Repeat stripes on as many nails as you’d like.
Step 7. Once your stripes are dry, finish with a thick top coat.
Voila! You now know how to give yourself a zebra striped manicure. Keep in mind when doing this with your opposite hand, it can get a little tricky. Just take it slow and you’ll be on your way to earning your stripes in no time!
The Faux Caviar Manicure
August 20, 2012

With manicure trends balancing on a line of bold and just plain crazy, it’s hard to find a style that is fun, practical and most improtantly appropriate for a variety of settings! There are few manicures that fit the criteria above like the faux caviar manicure. Trendy, eye catching and customizable! Follow the steps below to master this ‘appetizing’ nail trend!
Preparation: For this nail trend you can buy the Caviat Caviar nail kit (available at Sephora for $25) or you can be resourceful and check in to your local craft store for tiny beads! I went to Michaels and found a jar of tiny craft beads (available in a variety of colors for $8) which worked just as good! The choice is yours!
1. Gather your prep materials.
2. Give yourself a base coat. In this example I’m using black.
3 & 4. On the second coat, wait a few seconds until nails are tacky, not wet. Then, dip your nails into the ‘caviar’ beads. Once they are on your nail, press firmly to shape the nail and to prevent any loose beads from falling off.
5, 6, & 7. Continue step 2 on as many nails as you’d like. For a subtle look, try adding the beads to just the ring finger. For a bold statement, do all nails except the thumb! If you’re fearless, do all five fingers!
8. Once beads are on, add a thick clear top coat! This will hold the beads together so you won’t have any coming off throughout the day/night!
The key to fabulous results is to let this dry completely! If the beads are securely on and finished with a tight top coat, there is nothing stopping you from making your caviar nails the main course at your next few dinner parties!
The Splatter Mani
August 13, 2012

Let’s bring out our inner child for just a moment, the one who didn’t colour inside of the lines, and let them run loose on your nails. This tutorial allows you to have some fun, in terms of being a bit more free with the design. This nail tutorial is a bit more difficult because you have to forget everything you’ve learned about painting your nails: keeping everything neat and organized. Here, you must keep everything free and fluid, forgoing the notion of being perfect. I’m going to share some tips on perfecting this imperfect nail art.
- Start off with a neutral basecoat. I went with one with a more peachy undertone to play up the pastel colours I chose to splatter with, but a nude would work just as well–disclaimer, I’m keeping this as summer as possible, but deep, dark tones would be excellent for fall/winter. (more…)


