The Reverse Leopard Mani
June 19, 2012
Filed in: Nails
We all have to release our inner wild child at some point, so why not on our nails? This is a fun way to add some flair without being over the top. While it may seem difficult, it is much easier than you think (seriously, you are going to flip when you find out). All you need are three nail polish colors: a base color and two for your spots, and a toothpick for easy application. You can go traditional leopard, nude, black and brown or totally change it up! The possibilities are endless.

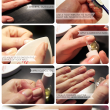
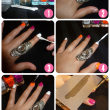
- Start by applying at least two coats of your base for a seamless canvas. Allow your nails to fully dry between steps before you start making your spots. This will prevent any unnecessary combining of colors.
- Now with your “spot” color, just dot them on your nail – with or without a toothpick, depending on how defined you want them. Do as many as you want but remember that you will have to outline them next, therefore prevent any of your spots from being too close together. I think four to six spots is plenty per nail (your thumb can get about six while your pinky can withstand four). Tip: If you can, I suggest investing in nail polish pens. They will make the design aspect much, much, much easier.
- Next, draw the outline of your spots. This may seem tricky at first, but you are essentially drawing a pair of parenthesis or brackets around the spots. Here use your toothpick to pick up the color.
- Apply your top coat and let them fully dry.
See how easy that was? Now start compiling different combinations for onlookers to gawk at because you are now a leopard mani expert.
Super Popular
Comment







Pingback: мертвое море
Pingback: Top 180 Nature Textures
Pingback: Premium Retro - Vintage Business Cards Templates
Pingback: Hostgator, Bluehost and Dreamhost
Pingback: www.templatesreview.com
Pingback: fsgb80v7cbwe
Pingback: Antispam
Pingback: ibhciupshuwen
Pingback: online casino games
Pingback: Kim Kardashian video
Pingback: facture auto entrepreneur
Pingback: lida hapı satış
Pingback: hardcore porn xxx tube
Pingback: Elisha Stambough
Pingback: dai hua lida
Pingback: free sex tape
Pingback: Dai hua lida
Pingback: eye cream reviews
Pingback: apple tv md199ll/a review
Pingback: zewzrctvybunifr5drx
Pingback: tgvtfcerxwztyhbnjjni
Pingback: online credit cards
Pingback: slim forte
Pingback: zsecrfvtbynuhnuj
Pingback: diseno-de-paginas-web
Pingback: insure home contents
Pingback: ????????
Pingback: games
Pingback: Online Casinos
Pingback: free cartomancy
Pingback: electric contractors
Pingback: http://www.bookofra.at
Pingback: Free Samsung Galaxy S3
Pingback: telefonsex test
Pingback: valencia
Pingback: bootstrap themes
Pingback: google maps marketing
Pingback: San Diego Bankruptcy Attorney
Pingback: cash advance loans
Pingback: prada sale
Pingback: erp systems
Pingback: viagra generico online
Pingback: busana muslim
Pingback: gay male
Pingback: FREE SHIPPING IPHONES
Pingback: online shopping malaysia
Pingback: light wood bedroom furniture
Pingback: how to save your marriage
Pingback: learn photography
Pingback: SEO Toronto
Pingback: how to lose weight fast
Pingback: w$p1erajmy hosp1cja
Pingback: music downloads free
Pingback: 500 fast cash
Pingback: obat tinggi badan
Pingback: facebook fans
Pingback: Green Coffee Bean
Pingback: cash advance houston
Pingback: payday loans direct lender
Pingback: Dr OZ Saffron Extracts
Pingback: payday loans las vegas
Pingback: click here - this is important
Pingback: Check this website
Pingback: manchester plumbers
Pingback: cash advance
Pingback: lida bayi
Pingback: Vancouver Kickboxing
Pingback: Bo
Pingback: computer online shop
Pingback: click for more
Pingback: lida satis
Pingback: San Antonio Property Management
Pingback: erfolgreich abnehmen
Pingback: dogru seo
Pingback: seocu seo
Pingback: online payday loans
Pingback: FREE SHIPPING
Pingback: online payday loan
Pingback: san antonio bonds
Pingback: cannabis culture
Pingback: payday loans dallas
Pingback: Magento Online Store
Pingback: casino on net
Pingback: y8
Pingback: DSL Anbieter
Pingback: tranny web cam
Pingback: windows doors Mississauga and Oakville
Pingback: Lloyd Irvin Rape
Pingback: payday loans online
Pingback: http://www.dlresearch.cn/dc/index.php?title=Bridge
Pingback: rao vat toan quoc
Pingback: Adam Smith
Pingback: pictures
Pingback: tenerife forum
Pingback: small scale business ideas
Pingback: repair
Pingback: be on reality tv
Pingback: swingers dating
Pingback: www.pogo
Pingback: cong ty seo
Pingback: marriage seminars dfw
Pingback: www.y8
Pingback: free credit report
Pingback: accredited degrees online
Pingback: life water ionizer review
Pingback: Can you get rid of herpes of the mouth
Pingback: KQYrzYMd
Pingback: personal injury law
Pingback: nsa personals
Pingback: here
Pingback: beat maker
Pingback: granuflo lawsuits
Pingback: cool math
Pingback: payday loans houston
Pingback: paxil lawsuit settlements
Pingback: mixtapes
Pingback: pu erh tea side effects
Pingback: Cheap Backlinks
Pingback: kitchen tile installation atlanta
Pingback: payday loans houston
Pingback: building inspections adelaide
Pingback: weight loss aids
Pingback: http://social.drupalcafe.od.ua/node/1103
Pingback: sex test
Pingback: telefon sex
Pingback: buy a good Computer
Pingback: miniclip.com
Pingback: telefon sex
Pingback: www.kongregate
Pingback: www.ben10
Pingback: he has a good point
Pingback: buy relevant links
Pingback: how to build backlinks
Pingback: book of ra
Pingback: payday loans st louis mo
Pingback: Garmin nüvi 2797LMT 7-Inch
Pingback: telefonsex
Pingback: nha hang tiec cuoi
Pingback: aktuelle meinpaket gutscheine
Pingback: gutscheincode sportscheck 10 euro
Pingback: gutscheincode teufel mai
Pingback: Thuong hieu doanh nghiep
Pingback: social media
Pingback: www.kizi.com
Pingback: notebooksbilliger gutschein versandkosten
Pingback: medimops gutschein 10 euro
Pingback: c&a gutschein 2013
Pingback: zalando lounge gutschein juni 2013
Pingback: gutscheincode mexx versandkostenfrei
Pingback: bao tin tuc
Pingback: social media
Pingback: gutschein neukunden vertbaudet
Pingback: gutscheincode docmorris 10 euro
Pingback: promod gutscheinnummer
Pingback: bestandskunden conrad gutschein
Pingback: bestandskunden thalia gutschein
Pingback: gutscheincodes von mister spex
Pingback: gutschein neukunden cewe
Pingback: blume2000 gutscheincode 10
Pingback: ??? ?????
Pingback: baur gutschein versandkosten
Pingback: weltbild gutschein versandkosten
Pingback: Jeffie Santio
Pingback: gutscheincode amazon versandkosten
Pingback: gutscheincode otto office mai
Pingback: gutscheincodes ernstings family
Pingback: Luana Cuez�
Pingback: koffer direkt gutschein versandkosten
Pingback: versandkostenfrei gutschein getgoods
Pingback: Eilene Sajovic
Pingback: rebuy gutscheine
Pingback: Orthodontist Chandler AZ
Pingback: pcfmojo.com
Pingback: Marketing Plastic Surger
Pingback: medical website design
Pingback: medical practice marketing
Pingback: GOING HERE
Pingback: Here
Pingback: abogados en linea en mexico gratis
Pingback: Bauchstraffung
Pingback: online-pr hannover
Pingback: Plastic Surgery SEO
Pingback: electrician raleigh nc
Pingback: tenerife forum
Pingback: vertebral experto en columna mejor doctor especial
Pingback: lose weight fast
Pingback: Google Sniper
Pingback: how to get bigger breasts without surgery
Pingback: Saffron Extract Select
Pingback: Brestrogen
Pingback: kwatery wladyslawowo
Pingback: Green Coffee Bean Max
Pingback: Simon
Pingback: Unique Hoodia
Pingback: Meratol
Pingback: Penomet
Pingback: Rogelio Slacum
Pingback: xdcygvuhbigbycrzrxyv
Pingback: best dermatologist NYC
Pingback: reiki healer
Pingback: asus f2 f2j 7 64bit
Pingback: Bisnis Investasi Aman
Pingback: Custom Dog Tags
Pingback: underage nude girl
Pingback: web hosting india
Pingback: weight loss lida
Pingback: cheap auto insurance
Pingback: look what I found
Pingback: kids shoes
Pingback: Homeowners Insurance FL
Pingback: IT Research Paper
Pingback: locksmiths london
Pingback: czy aspartam jest szkodliwy
Pingback: business ideas
Pingback: 3 credit reports free
Pingback: replica chanel handbags outlet
Pingback: save on vps hosting here
Pingback: Kary�
Pingback: pro lida
Pingback: garcinia cambogia
Pingback: telefonsex handy
Pingback: telefonsex
Pingback: electronic cigarette starter kit
Pingback: weight loss green coffee bean extract�
Pingback: webcam telefonsex
Pingback: hap lida
Pingback: Exie�
Pingback: cheap car insurance quote
Pingback: telefonsex
Pingback: telefonsex
Pingback: sahte lida
Pingback: online betting
Pingback: telefonsex test
Pingback: Josue Koerwitz
Pingback: Facebook Likes
Pingback: furniture stores melbourne
Pingback: Yellow Diamond Rings Shop
Pingback: empower network user
Pingback: belajar hipnoterapi
Pingback: Internet Marketing
Pingback: ice vending machines
Pingback: get Google Plus Circles
Pingback: batman arkham origins review
Pingback: VMware Promo Code
Pingback: plastic surgery corpus christi
Pingback: creacion de paginas web
Pingback: Video Presentation
Pingback: rxdtygvuohnklmpi
Pingback: model railway accessories
Pingback: save now
Pingback: guitars acoustic electric
Pingback: how to make your hair grow faster
Pingback: friv
Pingback: hair loss prevention
Pingback: vmware promo code
Pingback: Rio Grande
Pingback: cell phone plans
Pingback: Surface Works Unlimited
Pingback: Personal trainer Ventura
Pingback: business leads
Pingback: mortgage loan refinancing
Pingback: lisinopril 20 mg
Pingback: cash advance las vegas
Pingback: voyance par telephone sans carte bleue
Pingback: Window Repairs
Pingback: hcg diet
Pingback: Buy twitter followers
Pingback: aspartam szkodliwość
Pingback: Horticulture
Pingback: free bill of sale form
Pingback: san jose jumpers
Pingback: Zalando Gutschein
Pingback: stone walls
Pingback: car keys
Pingback: http://friendsofpersia.ahoowebdesign.com/groups/recommendations-to-come-across-inexpensive-vehicle-insurance-guidelines/
Pingback: more youtube views
Pingback: viagra online without prescription
Pingback: cheap louis vuitton handbags outlet
Pingback: stock market alerts
Pingback: Margo�
Pingback: http://www.prcarrier.com/press-releases-home/show-press-releases/30885/averson-insurance-agency-helps-in-finding-the-best-value-on-michigan-auto-insurance/business-services/
Pingback: heel spur treatment
Pingback: Donny Nette�
Pingback: Eldon Ellingham
Pingback: Parenting
Pingback: Home
Pingback: jelqing exercises
Pingback: viagra free pills
Pingback: how to unlock iphone
Pingback: children wear
Pingback: bill of sale 135
Pingback: clothing for girls
Pingback: life pisture quotes
Pingback: social media marketing
Pingback: aberturasdealuminio.webs.com
Pingback: http://posibilidades.educativas.co/index.php?title=Krystyna
Pingback: Durban Spa
Pingback: diettogo coupon
Pingback: Apartments by UCF
Pingback: Get a Hosting
Pingback: http://bestbeveragecoolers.com/marinecoolers.html
Pingback: web design london
Pingback: Click Here To Get A FREE Website
Pingback: úîåðåú ìñìåï
Pingback: ?????
Pingback: Tubelaunch reviews
Pingback: locksmiths mordan
Pingback: hypalone rubber sheet
Pingback: seo
Pingback: Palm Harbor Fl Abortion Clinic
Pingback: Roof Restoration Slacks Creek
Pingback: www.islamargarita.pw
Pingback: greenlabel.com
Pingback: buy google plus
Pingback: miracast devices
Pingback: fast money
Pingback: MBBS in Ukraine
Pingback: treadmill murah
Pingback: abortion west palm
Pingback: Annual performance appraisal report guidelines
Pingback: Quick Weight Loss Program
Pingback: Camping shower
Pingback: abortion pinellas
Pingback: tarpon springs fl abortion clinic
Pingback: abortion pills
Pingback: Forex megadroid robot review 2013
Pingback: triangle krav maga
Pingback: VIAGRA ENHANCEMENT
Pingback: buy youtube views
Pingback: Tratamientos naturales para aclarar la piel
Pingback: dong phuc
Pingback: kurye
Pingback: Calc
Pingback: real work at home jobs
Pingback: viagra
Pingback: How To Lose 10 Pounds In 3 Days
Pingback: buckyballs magnets
Pingback: Elizbeth Offermann�
Pingback: http://www.malpracticeinsurancedirect.com
Pingback: Youtube Rainmaker Review
Pingback: Cool stuff to buy
Pingback: hotmailcrearcuenta.webs.com
Pingback: Poker
Pingback: Mara Rask�
Pingback: Dating Guides
Pingback: bail bond agent
Pingback: Xela
Pingback: Magic
Pingback: candy crush saga lolipop
Pingback: services in a salon
Pingback: plugin
Pingback: kako napraviti web stranicu
Pingback: Camping tents
Pingback: Rosemary Trojanovich�
Pingback: payday loan lenders
Pingback: viagra
Pingback: online payday loan
Pingback: سعودي كول 6666 , شات سعودي كول
Pingback: Hotels 2013
Pingback: Guarda Moveis
Pingback: platform booties
Pingback: Empower Network Queensland
Pingback: forehead wrinkles
Pingback: this site
Pingback: Flugladen rabatt gutschein
Pingback: tanie loty qatar airwaystanie loty qatar airways
Pingback: rooms for rent I Apartments for rent
Pingback: www
Pingback: score
Pingback: direct payday lenders
Pingback: personal
Pingback: low blood pressure treatment
Pingback: fast cash loans
Pingback: kliknij
Pingback: cash advance online
Pingback: slot gratis senza soldi
Pingback: Promotional codes for 1800 flowers
Pingback: marketing online
Pingback: take my online class
Pingback: take my online class
Pingback: cheap viagra
Pingback: Monoatomic Gold
Pingback: easy way to make money
Pingback: spells
Pingback: cool nail polish
Pingback: best schools in nairobi
Pingback: steroids for sale
Pingback: online
Pingback: radiofrequenza bipolare
Pingback: resveratrol
Pingback: telefonsex
Pingback: handyman in surrey
Pingback: Bathmate
Pingback: Why Men Pull Away Review
Pingback: best diet for weight loss
Pingback: Monica Dush�
Pingback: Bathmate
Pingback: migrate to usa
Pingback: clinic
Pingback: cleaners surbiton
Pingback: anal penetration
Pingback: best online guitar lessons
Pingback: water ionizers
Pingback: telefon sex
Pingback: locksmiths london
Pingback: Saturn Gutschein 2013
Pingback: Kindle
Pingback: lapenindo
Pingback: parfum display
Pingback: Dui Attorney Fort Myers
Pingback: heel spurs cure
Pingback: follow us
Pingback: you could look here
Pingback: how to get rid of acne scars
Pingback: bail bond compan
Pingback: research chemicals
Pingback: Research Chemicals
Pingback: Adrian Leaman
Pingback: siemens gurgaon
Pingback: payday advance
Pingback: us fast cash
Pingback: web
Pingback: plr ebooks
Pingback: triangle krav maga
Pingback: Durban Airport
Pingback: natural soap for acne
Pingback: link directory
Pingback: baby-markt-gutschein.gutscheinversum.de
Pingback: cialis
Pingback: adult website hosting
Pingback: ambien
Pingback: may bay
Pingback: Injustice: Gods Among Us - FULL MOVIE
Pingback: how to get laid
Pingback: cougar dating sites
Pingback: how to get a boyfriend in high school
Pingback: forum seo
Pingback: argan oil hair
Pingback: full-service website creation
Pingback: business ideas
Pingback: discount golf bags
Pingback: bad credit loans
Pingback: real leather corsets
Pingback: Realtor Marketing
Pingback: rejuvenation treatment
Pingback: Salvage cars for sale
Pingback: http://visualdesignagency.com/social-media-marketing
Pingback: miley cyrus
Pingback: clapham
Pingback: Real Estate Columbia SC
Pingback: giochi di slot gratis
Pingback: giocare alle slot gratis
Pingback: great pools
Pingback: mayweather vs alvarez
Pingback: islami nisan
Pingback: How To Get Him Back
Pingback: Get Rid of Shin Splints
Pingback: Jonas Vikbladh
Pingback: organo gold
Pingback: apartments in atlanta ga
Pingback: http://www.lnnsports.com/ar/uefa-news/-----/6391
Pingback: holiday rentals
Pingback: bouteille personnalisee
Pingback: http://www.patricialaddcarega.com/index.php/member/51470/
Pingback: buy beats
Pingback: how to hack facebook accounts for free
Pingback: 10 persoons vakantiehuis aan zee nederland
Pingback: سعودي انحراف
Pingback: weegschalen
Pingback: سعودي انحراف 6666
Pingback: انحراف
Pingback: hotmailregistrarse
Pingback: pcfmojo.com
Pingback: small business ideas
Pingback: find
Pingback: porn password
Pingback: pub football
Pingback: blog gadgets
Pingback: Grumpysam1
Pingback: casino
Pingback: Make Money From Home
Pingback: internet furniture
Pingback: intelligence test
Pingback: http://www.ahtattos.com/bad-tattoos/comment-page-309/
Pingback: http://proactionservice.com/russkij-standart-podal-v-sud-1-chast/
Pingback: http://kwatemusic.com/page/14/
Pingback: Evia Stayer
Pingback: Receive SMS
Pingback: ahtattos.com/a-pornstar-with-tattoos/
Pingback: slot gratis online senza scaricare
Pingback: slot gratis
Pingback: slot gratis
Pingback: buy twitter followers with paypal
Pingback: bookofra slot gratis
Pingback: gore
Pingback: http://www.kozmetikklup.com/guzellik-merkezi-2
Pingback: buy a twitter account with followers
Pingback: slot gratis da bar
Pingback: Work From Home
Pingback: cialis
Pingback: how to reduce weight naturally
Pingback: Wheelchair motors
Pingback: basics of backbone js
Pingback: http://snowmini.esu1.org/groups/filemakerquicktipsandsoftwareexplanations/wiki/a7dc0/Spending_for_adult_and_obtaining_it_free_of_cost.html
Pingback: silver rings
Pingback: motivational speakers the best in the world
Pingback: sleep apnea mask
Pingback: http://www.youtube.com/watch?v=I9glIK7nRu4
Pingback: hair serum
Pingback: auto insurance quotes
Pingback: Kim Kardashian video sex
Pingback: visitare questo sito
Pingback: http://kwatemusic.com/page/4/
Pingback: dental
Pingback: buy truth about abs
Pingback: free minecraft
Pingback: Lifecell Cream Free Trial
Pingback: medical bill review
Pingback: Customized Fat Loss
Pingback: viagra
Pingback: viagra
Pingback: Rikki Walker naked
Pingback: http://www.slideshare.net/arfemr
Pingback: top social bookmarking site
Pingback: the Adonis golden ratio
Pingback: free minecraft
Pingback: question in yahoo answers
Pingback: church software
Pingback: tin hot
Pingback: herbalife
Pingback: Sabotage
Pingback: http://tryminecraftforfree.com/
Pingback: Belgravia Villas
Pingback: carpet cleaner
Pingback: SEO for dental websites
Pingback: candy crush saga lolipop
Pingback: wrestling
Pingback: free minecraft
Pingback: http://nohyoo.com/story.php?title=arife-aksu
Pingback: jual beli
Pingback: bookmarking
Pingback: Typing Test
Pingback: bill of sale
Pingback: property management software
Pingback: Moe Kash
Pingback: test slides
Pingback: Download Apple softwares
Pingback: Telephone answering Glasgow
Pingback: social bookmarking sites
Pingback: doctors note
Pingback: guzheng
Pingback: free minecraft
Pingback: frisco roofing
Pingback: getting rid of stretch marks at home
Pingback: types of chickens
Pingback: Backlinks Analyzer
Pingback: Casino
Pingback: how long does a bladder infection last
Pingback: kinds of toothpaste
Pingback: Christian dating
Pingback: website name
Pingback: best dating site
Pingback: Jasa SEO
Pingback: free minecraft
Pingback: Was hilft gegen cellulite hausmittel
Pingback: e cigarette starter kit free
Pingback: fundraising ideas for kids
Pingback: free minecraft
Pingback: free credit report instant
Pingback: giochi slot gratis senza scaricare
Pingback: European roulette
Pingback: slot machine
Pingback: viagra
Pingback: play online roulette practice
Pingback: free minecraft
Pingback: rubber sheet
Pingback: Loi de l'attraction
Pingback: https://twitter.com/NursenaAkcan
Pingback: Buy backlinks services
Pingback: online loans for bad credit
Pingback: peter chung eminata
Pingback: free minecraft
Pingback: www.ferozo.net
Pingback: rubbersheet
Pingback: free credit report company
Pingback: seguros de salud
Pingback: short term loans
Pingback: how to get money fast
Pingback: The Crew
Pingback: VistaPrint Coupon Code
Pingback: SEO Company
Pingback: free minecraft
Pingback: visit website
Pingback: nlp training courses london
Pingback: web hosts
Pingback: viagra
Pingback: viagra
Pingback: en iyi yabanci hosting
Pingback: jaiprakash associates ltd
Pingback: Video Production London
Pingback: she said
Pingback: Footwear
Pingback: viagra
Pingback: HOW TO EAT PUSSY
Pingback: rechtsschutzversicherung vergleich 24
Pingback: Ragdoll cat
Pingback: old english sheepdog puppies for sale
Pingback: emergency survival kit
Pingback: rental car dublin airport avis
Pingback: casino online aams con bonus senza deposito
Pingback: security jobs
Pingback: سعودي كول
Pingback: green label network
Pingback: angel readings
Pingback: hamburger hafen
Pingback: سعودي انحراف
Pingback: banana republic credit card
Pingback: سعودي كول
Pingback: new york personal injury lawyer
Pingback: ultimate demon discount
Pingback: Abstehende Ohren
Pingback: HP Officejet 4500
Pingback: سعودي انحراف
Pingback: crazy news
Pingback: reseller web hosting
Pingback: click here
Pingback: cirujanos plasticos
Pingback: Google+
Pingback: https://twitter.com/nursenaksel
Pingback: wicked lasers